To work with JavaScript, Magento 2 uses the RequireJS library. It is a module loader that implements the Asynchronous Module Definition (AMD) standard for JavaScript modules. Thanks to this library, the problem of page load speed and organizing JavaScript files is solved, and the files are loaded asynchronously. JavaScript program does not pollute the global namespace and it allows you to share the code and data between modules.
In this article, we will explain how to add an owl carousel and how to use one JavaScript component in multiple places. We will add a product slider on the homepage and a product slider with related products on the product page.
Homepage Product Slider
The homepage can be considered the most important part of every website. Customers see your homepage before they decide on whether to make a purchase or not, so your job is to make the homepage of your shop appealing to customers and functional. If not, they will probably leave your site immediately. One of the best ways to attract users is to insert products to your homepage. For this purpose, you can use the Magento 2 Catalog Products List widget.
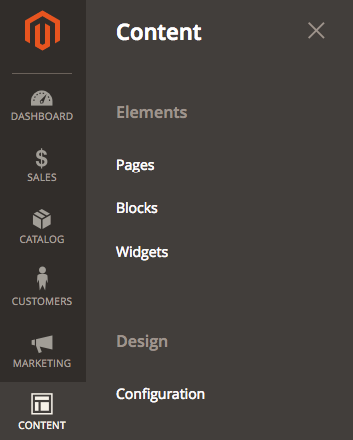
Step 1: Navigate to Content > Page
All of your store’s pages will be displayed here.

Step 2: Select Edit under Actions Menu
On Homepage title, from the Select drop-down, choose Edit under Actions menu. Then, go to the Content section and click on Insert widget.

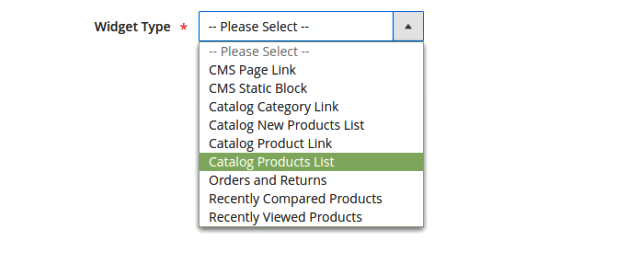
Step 3: Choose Catalog Products List Option
When the Insert Widget page appears, select the Catalog Products List option for the Widget Type.

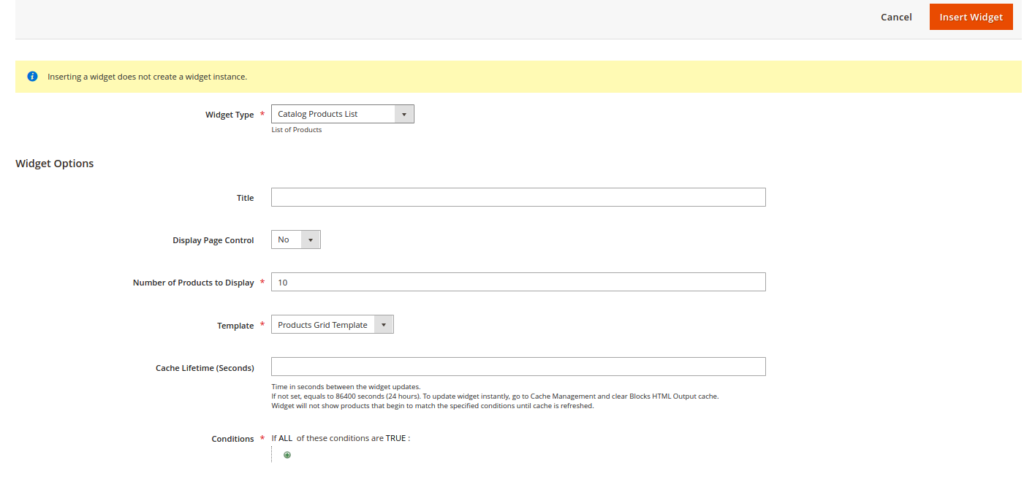
Step 4: Select a Category and Click on the Insert Widget Button
On the next page, there is a Conditions attribute. First, select a Category from the options and then choose the category you want to show on your store’s homepage. Finally, click on the Insert Widget.

Step 5: Click on Save to Finish
Come back to the Content tab, and you will see an icon for Products in the text box. Click on the Save button in order to complete the changes made on the page.

After you have added products you have to install Owl 2 Carousel. In order to do this, you will need the following files:
- owl.carousel.css
- owl.carousel.min.js.
Place the CSS file in:
app/design/frontend/<Vendor>/<theme>/web/css/owl.carousel.min.cssYou should add the CSS file only to the homepage, not to all pages. In order to achieve this, you must extend the XML file.
app/design/frontend/<Vendor>/<theme>/Magento_Cms/layout/cms_index_index.xmlExample:
<?xml version="1.0"?>
<!--
/**
 * Copyright © Magento, Inc. All rights reserved.
 * See COPYING.txt for license details.
 */
-->
<page xmlns:xsi="http://www.w3.org/2001/XMLSchema-instance" xsi:noNamespaceSchemaLocation="urn:magento:framework:View/Layout/etc/page_configuration.xsd">
            <head>
        <css src="css/owl.carousel.min.css"/>
    </head>
</page>
The js file will be placed in:
app/design/frontend/<Vendor>/<theme>/Magento_CatalogWidget/web/js/owl.carousel.min.jsAfter that, you can create your JavaScript component. In this component, you will initialize your carousel.
app/design/frontend/<Vendor>/<theme>/Magento_CatalogWidget/web/js/slider.jsExample:
define(['jquery', 'owlcarousel'], function($){
            $('.owl-carousel').owlCarousel({
                        loop: false,
                margin:10,
                nav:true,
                items: 3
            });
});
As you can see, the define function has two arguments:
- an array of dependencies
- a function that will execute when you initialize js component
Array of Dependencies
An array of dependencies is a series of modules that will be loaded before the function is executed. In this case, it is jquery and owl carousel. Owl carousel is your owl.carousel.min.js file. In this array, you need to set the path to these files and you should do it with RequireJS. Thanks to RequireJS, you can map your js file. So, we have to create requirejs-config.js.
app/design/frontend/<Vendor>/<theme>/Magento_CatalogWidget/requirejs-config.jsvar config = {
map: {
'*': {
productslider:'Magento_CatalogWidget/js/slider',
owlcarousel:'Magento_CatalogWidget/js/owl.carousel.min'
}
}
};Calling the js Component
In order to call your function and initialize the carousel, you need to call your component in the PHTML template. Magento has provided us with two ways of doing this:
- data-mage-init attribute
- <script type=”text/x-magento-init” /> tag
Both ways are very similar and both will be explained.
<script type=”text/x-magento-init” />
In:
app/design/frontend/<Vendor>/<theme>/Magento_CatalogWidget/templates/product/widget/content/grid.phtmlAt the end of the file, you need to add:
<script type="text/x-magento-init">
{
	"*": {
    	"productslider": {}
	}
}
</script>
This asterisk means that your js component will always be loaded in this template. You can also use a selector instead.
<script type="text/x-magento-init">
{
    ".product-items": {
        "productslider": {}
    }
}
</script>
The difference between an asterisk and a selector is that if an HTML element with a certain class does not exist, the JavaScript component will not be loaded.
<script type=”text/x-magento-init” /> allows you to send certain data from the template to our js component. You can send a JavaScript object and an HTML element. In other words, you can configure your carousel from the template.
<script type="text/x-magento-init">
{
    ".product-items": {
        "productslider": {"config":{"loop": false, "items": 4, "margin": 10, "nav": true}}
    }
}
</script>
Your component will now look like this:
define(['jquery', 'owlcarousel'], function($){
            return function(config, element){
                        $('.owl-carousel').owlCarousel({
                                    loop:config.config.loop,
                            margin:config.config.margin,
                            nav:config.config.nav,
                            items: config.config.items
                        });
            }
});
Also, you need to do one more thing – add the required classes for carousel:
app/design/frontend/<Vendor>/<theme>/Magento_CatalogWidget/templates/product/widget/content/grid.phtml

<ol class="product-items <?= /* @noEscape */ $type ?> owl-carousel owl-theme">
data-mage-init
<ol class="product-items <?= /* @noEscape */ $type ?> owl-carousel owl-theme" data-mage-init='{"productslider": {"config":{"loop": false, "items": 4, "margin": 10, "nav": true}} }'>Related Product Slider
Of course, you can use the same js component in other places as well. Just load the CSS for that page and call it to the template.
Then, you need to extend catalog_product_view.xml.
app/design/frontend/<Vendor>/<theme>/Magento_Catalog/layout/catalog_product_view.xml<?xml version="1.0"?>
<!--
/**
* Copyright © Magento, Inc. All rights reserved.
* See COPYING.txt for license details.
*/
-->
<page xmlns:xsi="http://www.w3.org/2001/XMLSchema-instance" layout="2columns-left" xsi:noNamespaceSchemaLocation="urn:magento:framework:View/Layout/etc/page_configuration.xsd">
<head>
<css src="css/owl.carousel.min.css"/>
</head>
</page>Finally, you have to call the component.
app/design/frontend/<Vendor>/<theme>/Magento_Catalog/templates/product/list/items.phtml<script type="text/x-magento-init">
{
".owl-carousel": {
"productslider": {"config":{"loop": false, "items": 2, "margin": 20, "nav": true}}
}
}
</script>Conclusion
Adding one JavaScript component in Magento 2 and using it in multiple places is one of the most useful steps towards creating a functional and well-designed online store.
Of course, if you need any frontend development services, feel free to contact us at [email protected].
Source
