Magento Commerce is extremely rich with features, many of which are available exclusively within the Magento 2 platform. Today, we are going to thoroughly describe the 10 features we find the most interesting and useful:
The Features – Our Top 10 List
- Content Staging
- B2B modules
- Admin Action Log
- Visual Merchandiser
- Store Credit
- Returns
- Rule-Based Related Products
- Gift Cards
- Multiple Wishlists
- Customer Segments
Without any further delay, let us take a closer look at the characteristics of these 10 amazing Magento Commerce features. They will surely change the design and functionality of your web store.
Content Staging
Managing the content of your pages has never been easier or more dynamic. This is all thanks to the Content Staging feature.
Apart from the general content management (creating, editing, previewing), you can trigger the appearance of certain elements of your web page, i.e., turn them on or off. The elements that can be changed are products, categories, catalog price rules, cart price rules, blocks, and widgets.
You are also able to create automatic monthly or yearly schedules around these changes. This highly contributes to improved content management. For example, you can select products, banners, and videos for certain events, let’s say, Christmas. Schedule them to start showing two weeks prior to the event and stop showing a week after the event.
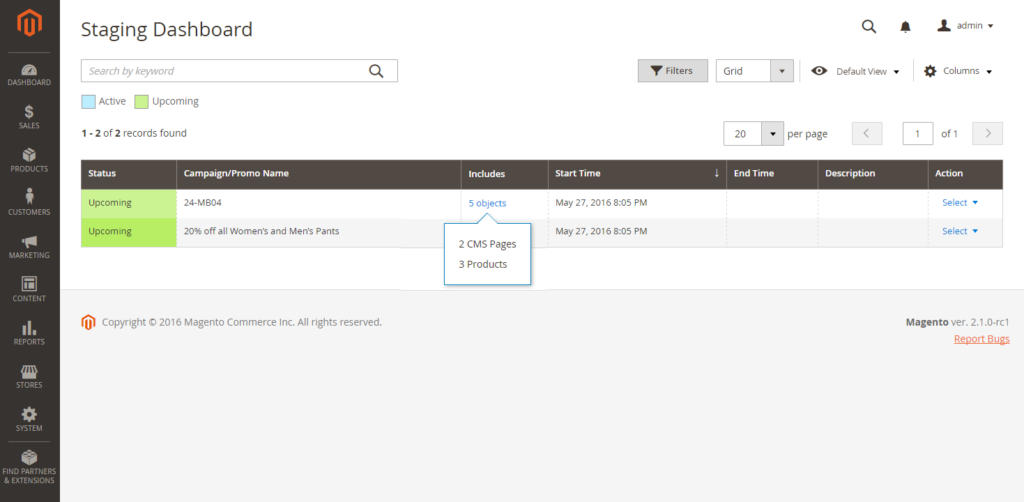
When this scheduled time expires, everything goes back to normal. In other words, the content of your web pages looks exactly like it did before. This group of changes is called ‘campaign’. The change of a single element can be called either ‘scheduled change’ or ‘scheduled update’. The campaigns that you have set can be seen on a calendar or timeline. You can easily manage them from the Staging Dashboard and preview them based on the time, date, and store view they are set for.
B2B Modules
B2B stands for Business to Business model. It refers to the exchange of products and services between two business owners. As you may remember, we have already explained it in one of our previous blog posts.
As opposed to the B2C model, B2B represents a connection between a Magento merchant, i.e., the seller, and a company with a wide network of employees who have different roles within the company, i.e., the buyer.
More precisely, the seller is the one who manages the system of the web store from the Magento Admin panel. On the other hand, the buyer is the company that wants to purchase the goods from the store. The seller’s job is to customize the purchase process based on the roles of the employees provided by the company’s admin. Differently put, the seller can configure the payment methods, pricing levels, requisition lists, gift cards, and more.
Examples
This is all made possible thanks to the numerous modules of the B2B feature. For example, multiple buyers of the same company can join their accounts into a single account. The Company module makes this possible.
The seller can allow a credit of a certain amount to companies. They can also manage credit settings and reimbursement, thanks to the CompanyCredit module.
ConfigurableSharedCatalog module allows the seller to set different pricing levels for the same products for different customer groups.
NegotiableQuote module supports the process of negotiation between a buyer and a seller. Its focus is on the prices of products and shipping prior to placing an order.
If a buyer wants to create an order based on the list of multiple SKUs, they can use the QuickOrder module.
RequisitionList is another very useful module. It allows the buyer to make multiple lists of the items they regularly buy and place orders by submitting them.
If you want to include a Gift Card into your requisition list, you can use the GiftCardRequisitionList module.
Admin Action Log
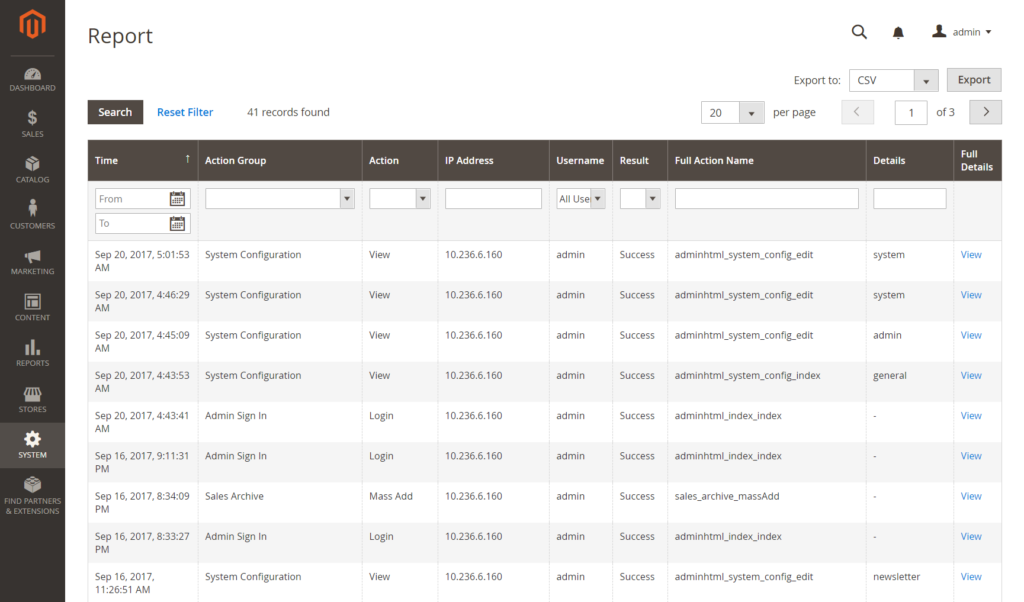
This Magento Commerce feature allows you to track every single step that admins take. In other words, you can monitor the process of developing and maintaining an online store. You can see which admin has logged in and when, added a specific product or category, modified an order, as well as which project an admin is working on. This is extremely helpful since you can monitor everything and fix the potential problems much easier.
In order to access these data, simply follow the path from the Admin sidebar: System > Action Logs > Report. The report consists of the following data: Time, Action Group, Action, IP Address, Username, Result, Full Action Name, Details, and Full Details.
Visual Merchandiser
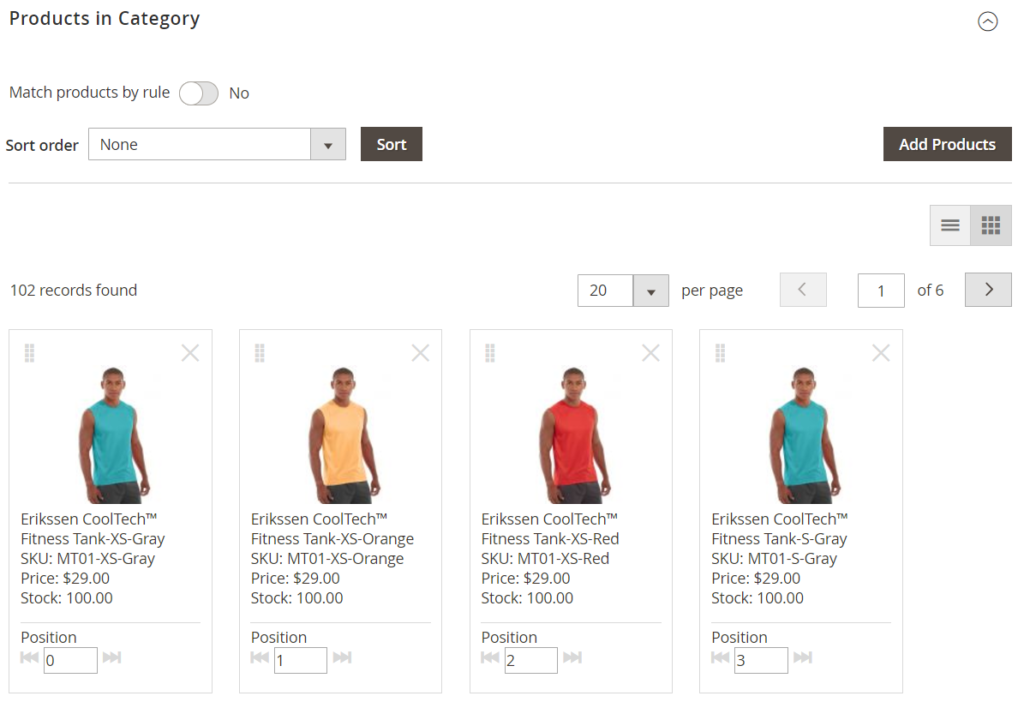
Visual Merchandiser is a collection of highly developed tools. It serves for setting the position and the appearance of your products within a certain category. It helps you create a dynamic selection of products that can be modified according to the catalog changes.
While creating the selection, you can choose one of the two modes – visual mode and the list of products. In visual mode, products are presented in the form of tiles.
During the process, you can switch between these two modes whenever you want. Just choose Catalog in the Admin sidebar, then Categories; select the category that you would like to edit and start using these advanced tools.
Another useful Magento Commerce feature related to the product categories is matching products by rule. By creating category rules, you assign one or more conditions. Based on them, the products are going to be displayed on your web store.
If you create a category rule for a specific type of product, they will be automatically added to the same list of products, no matter which category they belong to. Try setting a rule for a specific brand for women, and choose a season and color. All these products are going to appear in the same list of products. Smart attributes, values, and logical operators are parts of each condition.

Store Credit
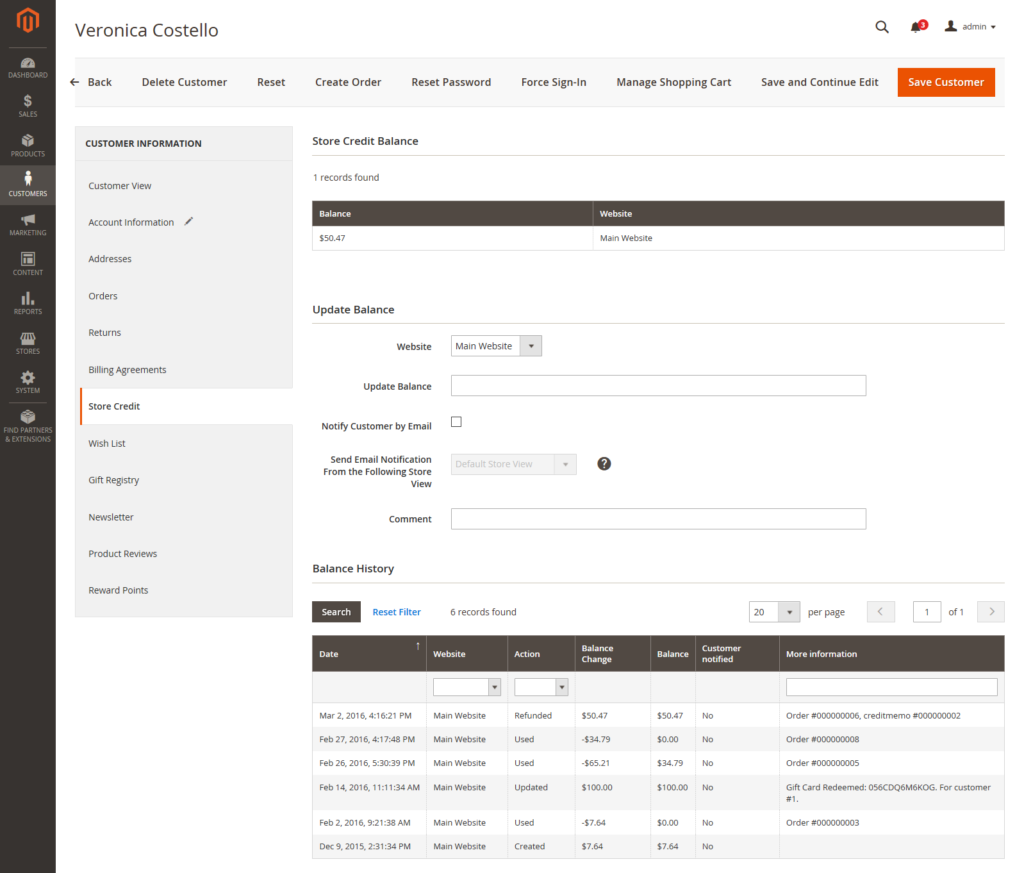
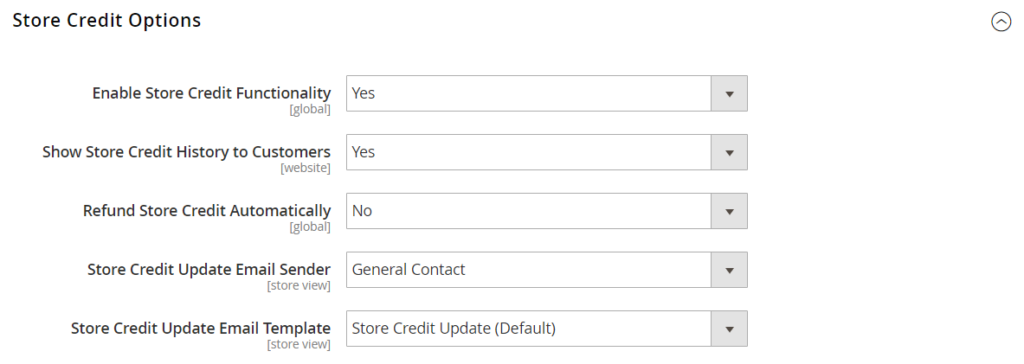
This extremely useful Magento Commerce feature automatically adds a credit amount to a customer’s account, thus rewarding customer loyalty and motivating them to continue purchasing goods from the store. You can view store credit balance and history, update the balance, send emails to your customers, and configure store credit in a few simple steps.
In order to view store credit balance, first choose “Customers” on the Admin sidebar, choose “All Customers” in the Operations section, select the wanted customer. Then click “Edit” in the Action column, and choose “Store Credit”.
Below the store credit balance, you can choose one of the options for updating the balance, and on the bottom of the page, you can view the balance history. When you update the balance, you can notify the customer about the changes that were made by sending them emails.
Should you want to set the store credit options, choose “Stores” on the Admin sidebar, then choose “Configuration” under “Settings”. The next thing to choose is “Customer Configuration” in the Customers section. Choose “Yes” for “Enable Store Credit Functionality”, choose the settings for other options below, and save configuration when you are done.
Returns
Another great feature of Magento Commerce – Returns. In case a customer wants to return a product, you can grant a unique RMA number (returned merchandise authorization). It allows them to identify the product in question.
You can enable certain groups of products that can be returned, or you can select all groups of products. The ones that cannot be enabled are virtual products, downloadable products, and gift cards. These settings are configured in Stores > Settings > Configuration > Sales > RMA settings. First, click “Yes” to enable RMA on Storefront and Product Level. Then, set the address for product returns – Store Address or Alternate Address.
When you finish, click “Save Config”. Please note that only simple, grouped, configurable, and bundle product types can be returned.
Rule-Based Related Products
Thanks to this amazing Magento Commerce feature, you can group the products that you want to display to customers. These may include related products, up-sell products, or cross-sell products, based on product rules.
In order to assign these rules to certain products, you have to choose “Marketing” on the Admin sidebar, and then follow the path Promotions > Related Product Rules. When you click “Add Rule”, you need to fill in the Rule Information section. The required fields are Rule Name, Status, and Apply To. In other words, you have to set the rule name, the status of the rule to “Active”, and select the group of products to which the rule applies to, i.e., related products, up-sells, cross-sells.
In addition, you can apply this rule to one customer segment, or to all customer segments. You can continue the configuration by choosing Products to Match, below the Rule Information section. Choose Product Match Conditions that you want to add, or leave blank if you want to match all products. The final section is Products to Display. Here, you can either add Product Result Conditions or leave blank to match all products.
Gift Cards
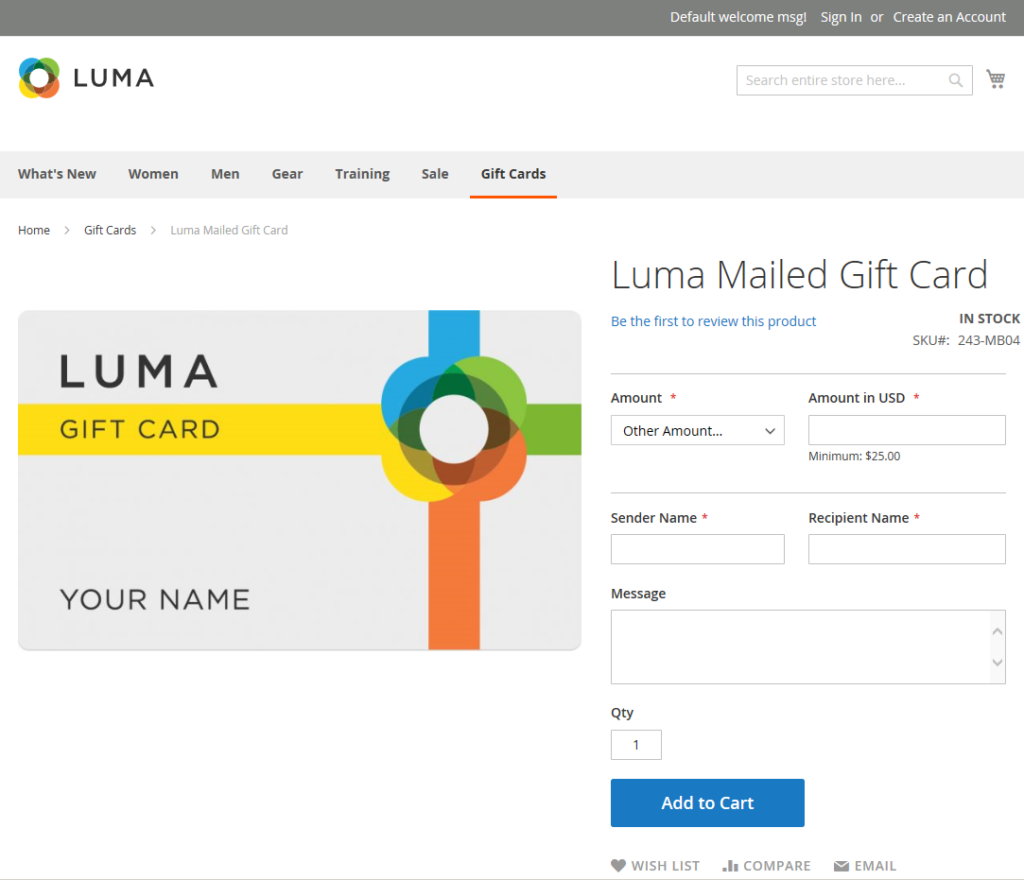
Magento Commerce enables you to send three types of gift cards to your friends or family: virtual, physical, or combined. You can send the first one via email, the second one to the recipient’s address, and you can email and ship the third one.
A person can use their gift card to pay for the whole purchase or just one part of it. Here is how the process of creating a gift card goes. To begin with, follow the path Catalog > Products. Then chose “Gift Card” from the section “Add Product”. You can add an attribute set in the search box, and then go on to the required fields: Product Name, SKU, and Card Type.
If you want to offer a choice of fixed gift card amounts to the customer, you can assign the fixed values by clicking “Add Amount”. On the other hand, if you want to leave it up to the customer to choose the amount, you can set “Open Amount” to “Yes”. Also, you can set the range of the minimum and the maximum amount by entering the values in “Open Amount From” and “To”.
As for the other settings, you can set the gift card to redeemable or non-redeemable, choose an expiration date (lifetime) of the card or leave it unlimited, allow a gift message, and customize an email template.
Multiple Wishlists
In order to manage this Magento Commerce feature, you need to follow the path Stores > Settings > Configuration > Customers > Wish List.
To activate the multiple wish list on your online store, choose “Yes” next to “Enable Multiple Wish Lists” in General Options. Then set the number of multiple wish lists allowed per customer, and specify the visibility of wish lists in the sidebar.
You can also set “Share Options”, such as the sender’s email address, the template of the email, the maximum number of sent emails, and the length of the email. Another thing you can manage here is My Wish List Link. You can select either “Display number of items in wish list” or “Display item quantities” next to “Display Wish Lists Summary”.
Customer Segments
Another very interesting Magento Commerce feature is Customer Segments. It allows you to choose a specific group of customers based on certain properties and dynamically display content to them.
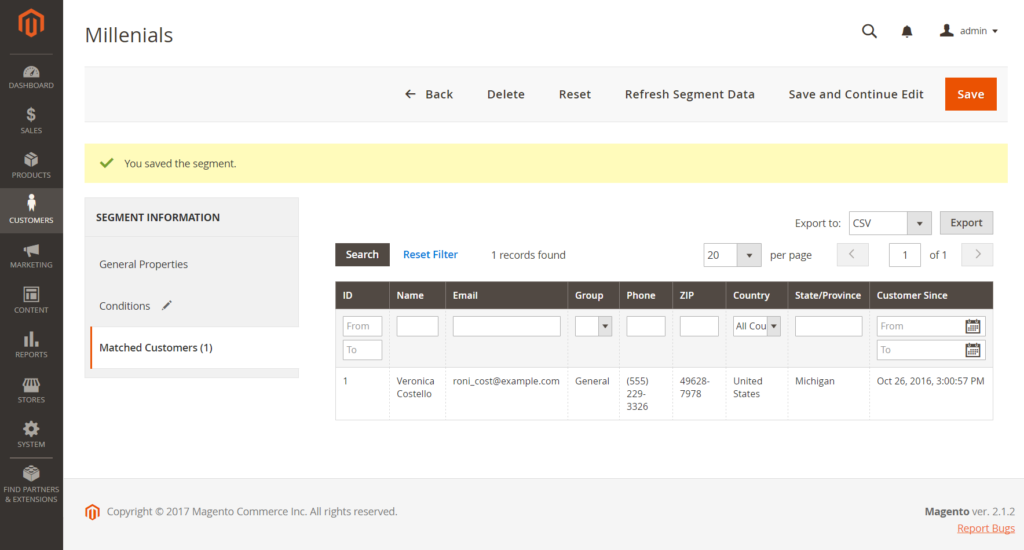
Customer Segments have the following attributes: Customer Address Fields, Customer Information Fields, Cart Fields, Products, and Order Fields. In order to create customer segments, you need to follow these 4 steps: Enable Customer Segments, Add a Customer Segment, Define the Conditions, and Generate the List of Matched Customers.
To enable Customer Segments, follow the path Stores > Setting > Configuration. Then click “Customer Configuration” under “Customers” and choose “Yes” next to “Enable Customer Segment Functionality”. In the end, click “Save Config” to save the changes.
Having enabled the customer segments, you can now go on to the next step and add a customer segment: Customer > Segments. Click on “Add Segment” and fill in the necessary information: Segment Name, Description, Assign to Website, Status, and Apply to.
The third step is to define the conditions for a customer segment. You need to click on “Add”, then select the condition and save it. When you finish, it is time for the last step.
Finally, to generate the list of matched customers, simply click “Matched Customers”. As a result, you will see a list of all the customers who match certain conditions. You can use the generated list to send promotions or emails.
Conclusion
To conclude, you have just been given 10 good reasons to choose Magento Commerce. The features that we have described today, as well as many more that are available exclusively in M2, are sure to contribute to the improvement of your eCommerce store.
Source: Magento User Guide
