If you are a Windows or Linux user and when doing cross-browser Web App testing, you often get into a situation where you need to find a way on how to get a hold on some Safari-capable environment.
Whether you decide on using a Mac, iPhone, or iPad for cross-browser Web App testing, you usually have 3 choices:
- Get your hands on a real Apple hardware (Mac, iPhone, iPad)
- Use remotely through some free or paid services to other people’s hardware
- Virtualize the Safari capable environment
Option 1
This is a pretty straightforward option, as well as the easiest one. But, it’s usually not available.
Option 2
This is a very good solution, and you can use many websites to test your Web application/website on other people’s hardware. Note that it usually involves paying for some plan/package or using limited trial options (which are sometimes enough, but not good for permanent and more serious cross-browser Web App testing).
Some of the options that have proved as good ones are:
- https://sizzy.co/ (a very nice parallel multi-device visual environment)
- https://www.browserstack.com/
- https://crossbrowsertesting.com/
The limit of 1 minute per environment can be circumvented on Mac setups by using a bug that changing desktop resolution (i.e., resets the timer).
Option 3
This is the scenario we will use if nothing else suits our needs. We will use Microsoft Windows 10 as our Host OS. The choice of Virtual Machine will be Oracle VM VirtualBox, and we will make the Mac OS Catalina 10.15 as a Virtual Machine.
Installing macOS on a Virtual Machine on Windows is technically not allowed as per Apple’s Terms of Use. So, we will use this just for cross-browser Web App testing purposes and education. In case anyone misuses this option it won’t be our responsibility.
Steps to Make Catalina VM
- Download macOS Catalina ISO
- Install Oracle VirtualBox on Windows PC
- Install VirtualBox Extension Pack
- Create and Configure a New Virtual Machine
- Configure VM through Command Prompt
- Start the Virtual Machine
- Create macOS Catalina Bootable Disk
- Perform a Clean Installation of Catalina
- Additional information
Download macOS Catalina ISO
Firstly, you need to download the ISO image for Catalina.
Install Oracle VirtualBox on Windows PC
Download the VirtualBox installation for Windows, and run the installation file.
[While you’re there, download the Oracle VM VirtualBox Extension Pack as well]
During the installation of VBox, you might get a security warning about “Oracle Corporation”. You need to click Install on this page to proceed with the installation. If you click Don’t Install, the installation process will be terminated here and you won’t be able to continue. In case you see the security warning again click the Install button.
Install VirtualBox Extension Pack
This step is not 100% necessary but it’s highly recommended since macOS Catalina might not be compatible with VirtualBox. For this reason, it might cause problems during the installation.
Also, this ensures USB3.0 ports work normally.
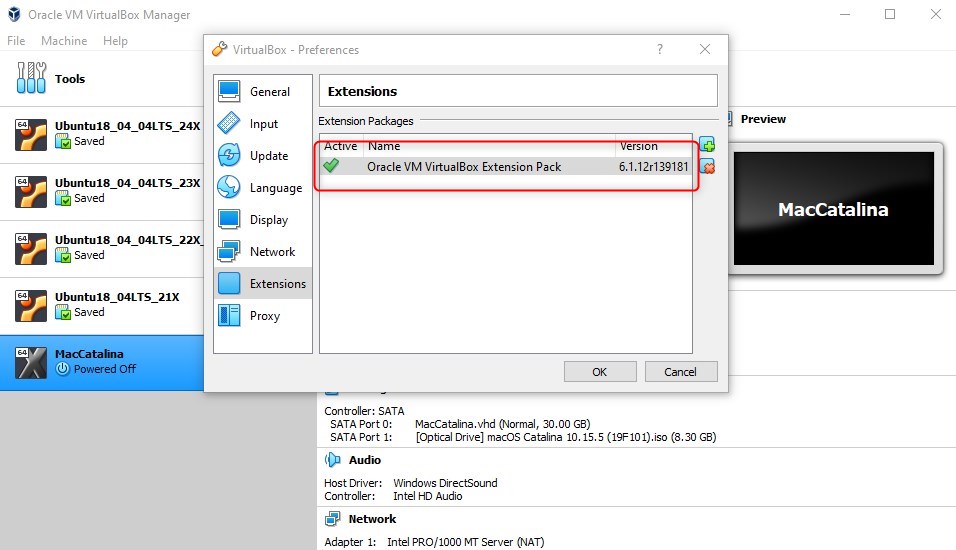
Just execute the downloaded file. If it does not automatically get used by VirtualBox Manager then open VM VirtualBox Manager > File > Preferences > Extensions > click on + sign > select downloaded file > Ok.
To verify, open the VM VirtualBox Manager and go to File > Preferences > Extensions. You should see something like this:

Create and Configure a New Virtual Machine
Creating a virtual machine for macOS Catalina is kind of the same as you would create a virtual machine for the Windows Operating system or Linux but with some minor changes. Follow the steps below to create a new virtual machine for macOS Catalina using an ISO file.
- Open up your VirtualBox application and click New
- Click Expert Mode and select the following options then click Create
- Type a suitable Virtual Machine Name
- Virtual Machine Location (a separate drive is recommended)
- Type (Mac OS X)
- Version (Mac OS X 64-bit)
- Memory 4 GB (recommended 8 GB or higher)
- Hard Disk: Select Create a virtual disk now
- In the Create Virtual Hard Disk window, choose the following options
- Disk Location: The default location should be fine unless you want to change to a new location
- File Size: you can specify the disk size here
- Hard disk file type: Select VHD (Virtual Hard Disk) format
- Storage on physical hard disk: Select the Dynamically allocated option. However, if you want to have a better performance disk then choose a fixed disk. The fixed disk will allocate the specified size from your host machine immediately.
- It’s time to edit the virtual machine to make it work. Select macOS Catalina VM and click Settings. Now, bring the following changes to macOS Catalina VM.
- Under System>Motherboard, increase the Base Memory to 12281MB. However, you can use a bit lower memory if your system doesn’t have this much RAM.
- Uncheck Floppy from the Boot Order section.
- Under the Processor tab, increase the processors to 4 or higher. If there is a low number of CPUs it will work with 2.
- On the Display window, increase the Video Memory to 128MB.
- From the Storage section, click on the Empty>DVD icon. Click on Choose a disk file. you should select macOS Catalina ISO which you’ve previously downloaded. Finally, click OK to close the macOS Catalina Settings window.
Configure VM Through Command Prompt
First, you should notice your virtual machine name because we will use it later on.
Important Note: We highly recommend quitting the VirtualBox program before executing the following code. If you don’t do it, your virtual machine might not proceed to the installation step.
Run the following code line by line via command prompt (CMD). You can open the command prompt by pressing the Windows+X key in Windows 10 and select Command Prompt from the list. Or, simply press the Windows key and type CMD. Click Run As Administrator and click Yes.
Replace the “VM Name” with your virtual machine name.
cd "C:\Program Files\Oracle\VirtualBox\"
VBoxManage.exe modifyvm "VM Name" --cpuidset 00000001 000106e5 00100800 0098e3fd bfebfbff
VBoxManage setextradata "VM Name" "VBoxInternal/Devices/efi/0/Config/DmiSystemProduct" "iMac19,1"
VBoxManage setextradata "VM Name" "VBoxInternal/Devices/efi/0/Config/DmiSystemVersion" "1.0"
VBoxManage setextradata "VM Name" "VBoxInternal/Devices/efi/0/Config/DmiBoardProduct" "Mac-AA95B1DDAB278B95"
VBoxManage setextradata "VM Name" "VBoxInternal/Devices/smc/0/Config/DeviceKey" "ourhardworkbythesewordsguardedpleasedontsteal(c)AppleComputerInc"
VBoxManage setextradata "VM Name" "VBoxInternal/Devices/smc/0/Config/GetKeyFromRealSMC" 1
Now is a good time to fix Catalina screen resolution. Later on, if you want to change the screen resolution you can just quit VirtualBox and run the code for the desired resolution and start VM again. Beware: to avoid problems, do not put VM in a saved state, but shut it down before quitting VM VirtualBox Manager.
VBoxManage setextradata "VM Name" VBoxInternal2/EfiGraphicsResolution HxVYou have to change “VM Name” with your virtual machine name and HxV with a screen resolution such as “1280×720“. For more supported screen resolutions on VirtualBox and a reference on changing the screen resolution download This File.
Start the Virtual Machine
Open the VirtualBox app and select your VM. Then, click the Start button.
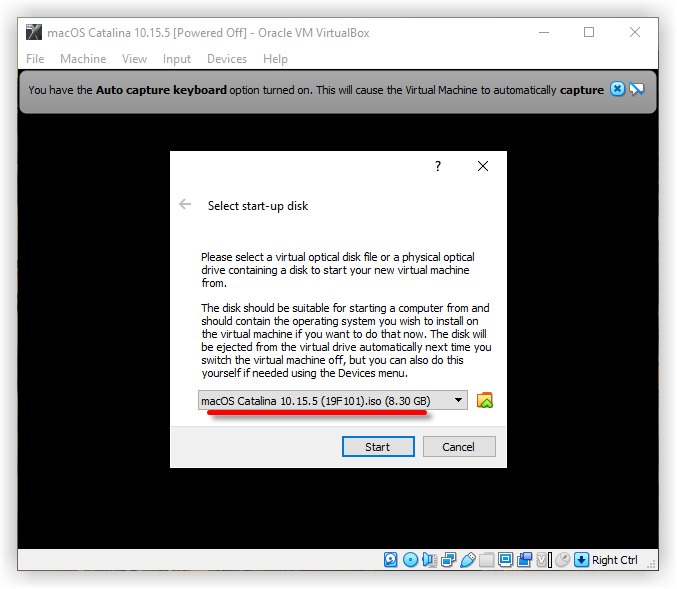
Once you’ve started your virtual machine, you might have to choose which ISO to select. If you’ve attached only one ISO image you probably will not see the window below. Just make sure you’re using the right macOS Catalina ISO.

Create macOS Catalina Bootable Disk
Once you start your VM, a whole bunch of code will run on the screen. You should not be worried about it. Wait for a few minutes, and you should see the macOS Catalina Language window. Select your Language and click the Continue arrow.
Now, you’ll see the macOS Utilities window. From the list, select Disk Utility and click Continue.
Select your main VHD Disk and click the Erase button. Choose the following options and click Erase again.
- Name: Catalina Disk (you can type any name you want)
- Format: APFS (If you get an error, select Mac OS X Extended Journaled)
- Scheme: GUID Partition MAP
Now, close the Disk Utility window.
From macOS Utilities, select Install macOS and click Continue.
Click Continue on the Install macOS Catalina screen.
Agree to the macOS Catalina License Agreement.
Select macOS Catalina Disk and click Install.
Then, wait for 3 minutes and your VM will restart. macOS Catalina will be installed on your Disk. Next, you should not do anything. You’ll see the installation window for another 30 minutes.
Perform a Clean Installation of Catalina
Once it’s finished, you’ll see the macOS Catalina Welcome window. Select the following options. You can change most of the settings later on, so don’t worry about it for now.
- Select your Country and click Continue.
- Choose a Keyboard Layout and click Continue. If you’re not happy with default settings, you can customize the Settings.
- On the “Data & Privacy” window, click Continue.
- Select Don’t transfer any information now.
- Click on Setup Later then Don’t Sign In. Click Skip. You can add your Apple ID later.
- Click Agree to the Terms and Conditions and click Continue.
- Fill out the Full Name, Account Name, Password, and Hint. Then, click Continue.
- If you want to customize Express Set Up, you can click on Customize Settings, otherwise, click on Continue.
- On the Analytics window, click Continue.
- On-Screen Time, click Set up Later.
- Do not set up Siri for now. Just skip it.
- Select an appearance theme and click Continue. You can choose between dark/light mode and Auto mode.
- Wait a few seconds for your macOS to be set up.
- Finally, close Feedback Assistant for now and close the mouse & keyboard window.
Additional information
- When creating a hard disk for your VM never go for less than 25GB (or 30, to be safe) or you will have problems later on.
- Always quit VM VirtualBox Manager before changing screen resolution via code.
- If you have issues with your mouse, using an old mouse does the trick.
Wrap Up
And that’s how you get Apple from Oracle for cross-browser Web App testing. Make sure to follow our blog for more tips & tricks.
In case you need any tech help, feel free to contact us.
