Introduction
In this article, we are going to make custom shipping methods and custom fields that will be shown in the cart summary. We will use some simple examples that contain just the necessary code. This is a piece of must-have knowledge for every developer and it’s pretty simple. Every start is hard but it is a start!
Part 1: Custom Shipping Methods
Firstly, you need to create the file app/code/Vendor/Module/Model/Carrier/Exampleshipping.php.
The code below is an example skeleton of how it needs to be done. Feel free to play with it by adding your custom shipping options, custom prices, etc.
<?php

namespace Vendor\Module\Model\Carrier;

use Magento\Quote\Model\Quote\Address\RateRequest;
use Magento\Shipping\Model\Rate\Result;

class Exampleshipping extends \Magento\Shipping\Model\Carrier\AbstractCarrier implements
    \Magento\Shipping\Model\Carrier\CarrierInterface
{

    protected $_code = 'exampleshipping';

    protected $_isFixed = true;

    protected $_rateResultFactory;

    protected $_rateMethodFactory;

    /**
     * Constructor
     *
     * @param \Magento\Framework\App\Config\ScopeConfigInterface $scopeConfig
     * @param \Magento\Quote\Model\Quote\Address\RateResult\ErrorFactory $rateErrorFactory
     * @param \Psr\Log\LoggerInterface $logger
     * @param \Magento\Shipping\Model\Rate\ResultFactory $rateResultFactory
     * @param \Magento\Quote\Model\Quote\Address\RateResult\MethodFactory $rateMethodFactory
     * @param array $data
     */
    public function __construct(
        \Magento\Framework\App\Config\ScopeConfigInterface $scopeConfig,
        \Magento\Quote\Model\Quote\Address\RateResult\ErrorFactory $rateErrorFactory,
        \Psr\Log\LoggerInterface $logger,
        \Magento\Shipping\Model\Rate\ResultFactory $rateResultFactory,
        \Magento\Quote\Model\Quote\Address\RateResult\MethodFactory $rateMethodFactory,
        array $data = []
    ) {
        $this->_rateResultFactory = $rateResultFactory;
        $this->_rateMethodFactory = $rateMethodFactory;
        parent::__construct($scopeConfig, $rateErrorFactory, $logger, $data);
    }

    /**
     * {@inheritdoc}
     */
    public function collectRates(RateRequest $request)
    {
        if (!$this->getConfigFlag('active')) {
            return false;
        }

        $shippingPrice = $this->getConfigData('price');

        $result = $this->_rateResultFactory->create();

        if ($shippingPrice !== false) {
            $method = $this->_rateMethodFactory->create();

            $method->setCarrier($this->_code);
            $method->setCarrierTitle($this->getConfigData('title'));

            $method->setMethod($this->_code);
            $method->setMethodTitle($this->getConfigData('name'));

            if ($request->getFreeShipping() === true ||  $request->getPackageQty() == $this->getFreeBoxes()) {
                $shippingPrice = '0.00';
            }

            $method->setPrice($shippingPrice);
            $method->setCost($shippingPrice);

            $result->append($method);
        }

        return $result;
    }

    /**
     * getAllowedMethods
     *
     * @param array
     */
    public function getAllowedMethods()
    {
        return [$this->_code => $this->getConfigData('name')];
    }
}
The previous part is responsible for rendering shipping options for the custom shipping method.
The following part is config.xml where we are going to state the model and options for this method.
Then, create a file in etc/config.xml.
Afterward, add your code for config.xml. Below is an example:
<?xml version="1.0" ?>
<config xmlns:xsi="http://www.w3.org/2001/XMLSchema-instance" xsi:noNamespaceSchemaLocation="urn:magento:module:Magento_Store:etc/config.xsd">
	<default>
		<carriers>
			<exampleshipping>
				<model>Vendor\Module\Model\Carrier\Exampleshipping</model>
				<active>0</active>
				<title>Exampleshipping</title>
				<name>Exampleshipping</name>
				<price>0.00</price>
				<specificerrmsg>This shipping method is not available. To use this shipping method, please contact us.</specificerrmsg>
				<sallowspecific>0</sallowspecific>
			</exampleshipping>
		</carriers>
	</default>
</config>
This code will set the title to Exampleshipping, price to 0, and specificerrmsg to some custom text. The model should contain a link to the Model/Carrier file which is used for rendering that method and options.
And the last important thing for us and our module is to create a file at etc/adminhtml/system.xml with its example below.
<?xml version="1.0" ?>
<config xmlns:xsi="http://www.w3.org/2001/XMLSchema-instance" xsi:noNamespaceSchemaLocation="urn:magento:module:Magento_Config:etc/system_file.xsd">
	<system>
		<section id="carriers" showInDefault="1" showInStore="1" showInWebsite="1" sortOrder="1000" translate="label">
			<group id="exampleshipping" showInDefault="1" showInStore="1" showInWebsite="1" sortOrder="10" translate="label">
				<label>Exampleshipping</label>
				<field id="active" showInDefault="1" showInStore="1" showInWebsite="1" sortOrder="10" translate="label" type="select">
					<label>Enabled</label>
					<source_model>Magento\Config\Model\Config\Source\Yesno</source_model>
				</field>
				<field id="name" showInDefault="1" showInStore="1" showInWebsite="1" sortOrder="20" translate="label" type="text">
					<label>Method Name</label>
				</field>
				<field id="price" showInDefault="1" showInStore="1" showInWebsite="1" sortOrder="30" translate="label" type="text">
					<label>Price</label>
					<validate>validate-number validate-zero-or-greater</validate>
				</field>
				<field id="sort_order" showInDefault="1" showInStore="1" showInWebsite="1" sortOrder="40" translate="label" type="text">
					<label>Sort Order</label>
				</field>
				<field id="title" showInDefault="1" showInStore="1" showInWebsite="1" sortOrder="50" translate="label" type="text">
					<label>Title</label>
				</field>
				<field id="sallowspecific" showInDefault="1" showInStore="1" showInWebsite="1" sortOrder="60" translate="label" type="select">
					<label>Ship to Applicable Countries</label>
					<frontend_class>shipping-applicable-country</frontend_class>
					<source_model>Magento\Shipping\Model\Config\Source\Allspecificcountries</source_model>
				</field>
				<field id="specificcountry" showInDefault="1" showInStore="1" showInWebsite="1" sortOrder="70" translate="label" type="multiselect">
					<label>Ship to Specific Countries</label>
					<can_be_empty>1</can_be_empty>
					<source_model>Magento\Directory\Model\Config\Source\Country</source_model>
				</field>
				<field id="specificerrmsg" showInDefault="1" showInStore="1" showInWebsite="1" sortOrder="80" translate="label" type="textarea">
					<label>Displayed Error Message</label>
				</field>

</group>
		</section>
	<system>
</config>
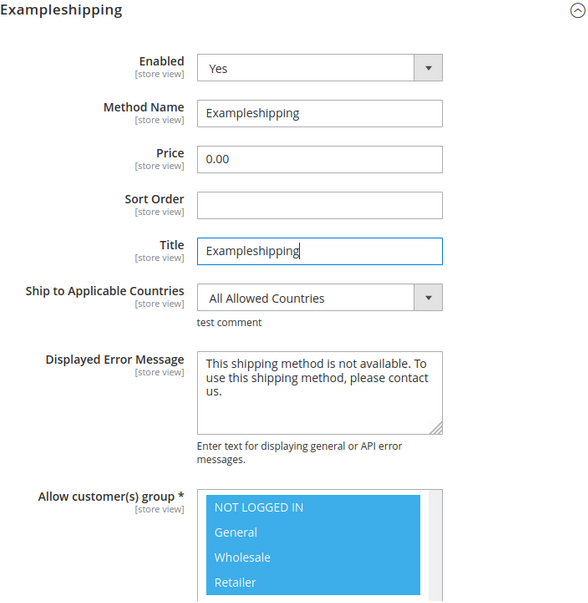
With system.xml we can tell that our module is ready for display. Run the commands that are stated at the end of the page and refresh admin and frontend. Then, you should be able to see your custom shipping method and its options.
Part 2: Custom Fields at Cart Summary
Firstly, make preference in app/code/Vendor/Module/etc/di.xml.
<preference for="Magento\Checkout\Block\Cart\LayoutProcessor" type="Vendor\Module\Model\Checkout\Block\Cart\Shipping" />Secondly, create the following file:
app/code/Vendor/Module/Model/Checkout/Block/Cart/Shipping.php
Thirdly, copy and paste the code from the core as you are going to extend this file:
vendor/magento/module-checkout/Block/Cart/LayoutProcessor.php
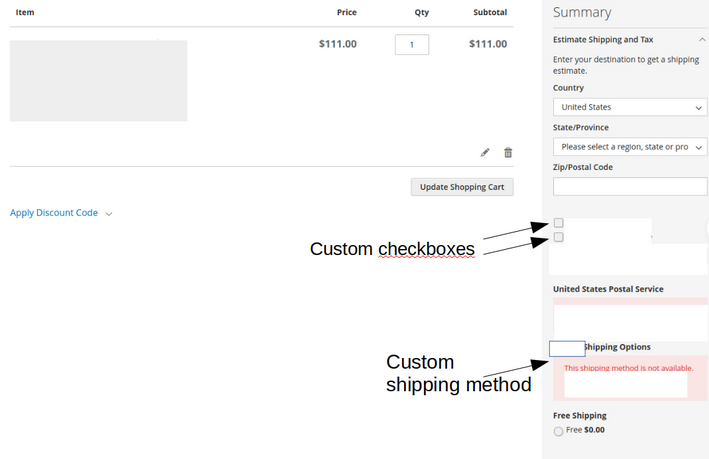
In the function, the public function process($jsLayout), append more fields in $elements array which is already defined there. See an example of a field below.
'postcode' => [
   'visible' => true,
   'formElement' => 'input',
   'label' => __('Zip/Postal Code'),
   'value' => null
]
Instead of setting ‘visible’ to true you can make a function that will return some value, based on your needs, for example:
/**
* Show customField in Shipping Estimation
*
* @return bool
* @codeCoverageIgnore
*/
protected function isCustomFieldActive()
{
   return true;
}
Another example:
/**
* Show City in Shipping Estimation
*
* @return bool
* @codeCoverageIgnore
*/
protected function isCityActive()
{
   return false;
}
Here are some images of this custom extension that we have built for both backend and frontend:


Bonus: Implement Observer for Saving Configuration in Admin
As a bonus, we will provide information on how to implement an Observer. It will be listening for saving the configuration in admin panel shipping method options.
First, create events.xml in app/code/Vendor/Module/etc and add the following code:
<?xml version="1.0" encoding="UTF-8"?>
<config xmlns:xsi="http://www.w3.org/2001/XMLSchema-instance" xsi:noNamespaceSchemaLocation="urn:magento:framework:Event/etc/events.xsd">
   <event name="admin_system_config_changed_section_carriers">
       <observer name="custom_admin_system_config_changed_section_carriers" instance="Vendor\Module\Observer\ConfigChange"/>
   </event>
</config>
After creating the xml file, you will need to create the ConfigChange.php file. Here is an example path:
app/code/Vendor/Module/Observer/ConfigChange.php
Assuming that you have created the file above, the files need to contain the class name like below.
/**
* Class ConfigChange
* On configuration change it validates entered data
*/
class ConfigChange implements ObserverInterface
{
...
There should be two functions in the file: one for execute and one for validating data. Please refer below. And please add all the code you need in the try catch block.
public function execute(EventObserver $observer) { ... }public function validateData($params) { ...
try {
} catch (\Exception $exception) {
$this->response->setHttpResponseCode($exception->getCode());
return $this->messageManager->addError(__($exception->getMessage()));
}
}Add breakpoint after { in functions. Then, go to the backend and save the shipping method settings and your debugger will stop at these breakpoints. Go ahead and try it for yourself. Feel free to play with it.
After some major changes that require deploy or clearing of the cache, you should run the commands below and refresh the frontend/admin page.
php bin/magento setup:di:compile
php bin/magento setup:upgrade
php bin/magento setup:static-content:deploy -f
php bin/magento c:f
Conclusion
So, now you know how to implement custom shipping methods and custom fields in the cart summary (on the cart page). Also, you have learned how to make an Observer that will monitor any changes that are being saved for that shipping method in the admin section.
Stay tuned for more interesting blog posts from our team and myself. And, of course, if you need any tech help, feel free to contact us at office@admin
Source

What an excellent and helpfull article!