Developing for Magento 2 has never been… well, more difficult, at least when we compare it with Magento 1. Back in the days of Magento 1 (though these days are far from over as there are still more Magento 1 websites than Magento 2 websites but the majority of Magento developers have moved on to Magento 2) things were simple – install PHP, Apache, and MySQL and you’re set to go.
For Magento 2, there are a few more services that require a bit more sys admin type of skills. We can deploy Elasticsearch, Varnish, Redis… Then, there’s a whole new deployment process and lots of different ways to go about it. Arguably, Elasticsearch and Varnish are applicable to M1 but with M2 they essentially became the norm. These can be challenging to set up on a single server, especially if you want to develop or work on multiple projects/websites. Of course, each of them needs access to Varnish, Elasticsearch, or any other similar service. Why? Because you want to have a development environment that behaves as close as possible to the production environment, don’t you?
To that end, I will try to make a case for using Docker as a useful tool to set up a local environment. First of all, I strongly believe in understanding every step of the process before using it. So, let’s start building the setup in such a manner.
Technologies Used
- A lightweight container software – Docker
- A program to manipulate, orchestrate if you will, multiple Docker containers into a single network – Docker Compose
- A script to keep the file system between Docker containers and host OS in sync. It works best on Linux and essentially allows you to modify files inside a Docker container as if a user is working on the Docker container itself – Docker Sync
Docker Setup
To start off, we will need a local directory where to put all the needed files. I like to place every project under ~/Projects/ folder (~ designates home directory). So, I will put all the needed files under:
~/Projects/ExtensionDevelopment/
Here’s how that directory looks like:
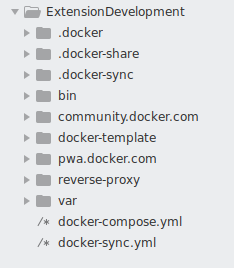
Not all of these files/dirs are needed, and Docker generates only a few of them. The ones you need are the following four:
- .docker/
- docker-compose.yml
- docker-sync.yml
- pwa.docker.com (there’s also a community.docker.com as I’m running two Magento installations, but we can disregard the community.docker.com for the sake of this article)
Through them, all the configuration/setup is achieved.
Docker-compose
The idea is to isolate every Magento 2 requirement as much as possible. Why? Because we can then reuse the isolated requirements (Docker containers really) for each new project. To do so, we will use docker-compose and we will create each requirement as a separate service.
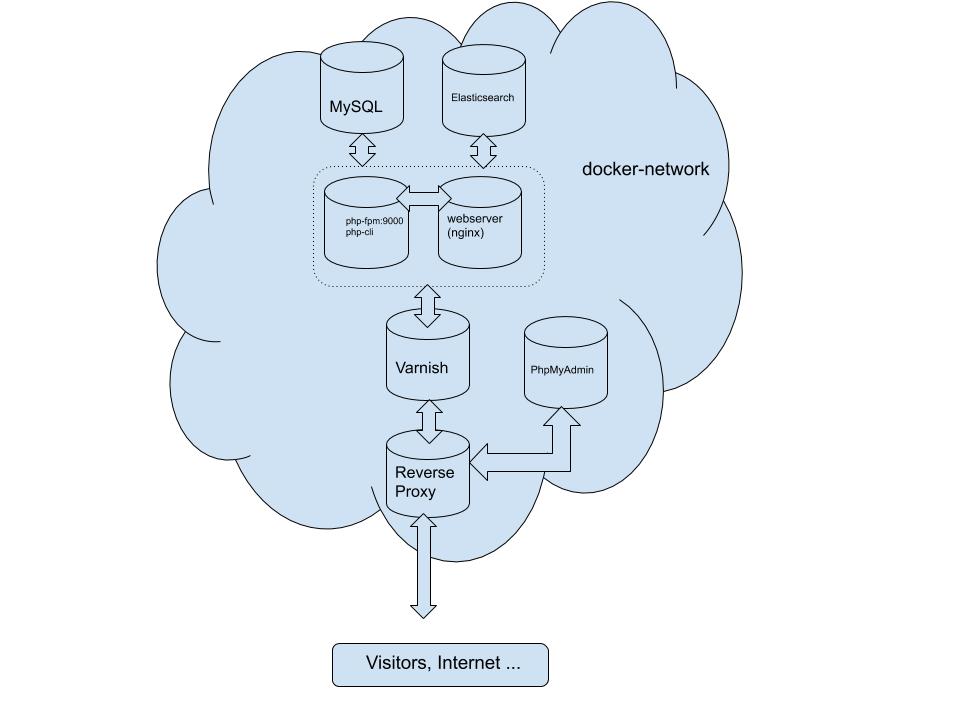
So, the goal is a cluster of servers:
- Reverse proxy running Nginx and doing the SSL termination
- Varnish server that sits between reverse proxy and the Web Server
- Web Server (Nginx) for Magento installation (hosts Magento 2 installation files); uses PHP server to interpret PHP files
- PHP (fpm) server that runs php-fpm on port 9000 and php-cli interpreter
- MySQL server
- phpMyAdmin server, to ease the access and manipulation of the database
This is how the docker-compose.yml file will look like. Please, note that I have added inline comments instead of providing an explanation way down below the file.
version: '3'
services:
 reverse:
   image: nginx:latest
   hostname: reverse
   # Explanation:
   # we’re stating hostname here so reverse proxy can be accessed from other containers
   # by this hostname (the hostname must be identical to service name)
   # ports 80 and 443 will be mapped to reverse server (note that if you’re running on host
   # system apache, nginx or any other server with default settings, powering up this network
   # will fail as reverse server will attempt to allocate these two ports of the host).
   ports:
     - "80:80"
     - "443:443"
   Volumes:
     # Explanation
     # .docker/ folder is created to put a few configurations for containers.
     # Specifically, we share the conf.d/ folder so nginx config is available for
     # manipulation from host system and this is the folder that vhost files for
     # nginx goes. See later on the conf.d/pwa.docker.com.conf file as example.
     - ./.docker/reverse-proxy/config/conf.d:/etc/nginx/conf.d
     # Placing here ssl keys (for local development I’ve generated *.docker.com keys
     # and I’m placing all my development project as _project_name.docker.com subdomains
     # so I can use the same set of keys for each of them.
     - ./.docker/reverse-proxy/certs:/etc/ssl/private
     # Logs - again mapping this in order to be able to access logs easilly.
     - ./reverse-proxy/var/logs:/var/log/nginx
   networks:
     - docker_network
 varnish:
   image: varnish:stable
   hostname: varnish
   volumes:
     - ./.docker/varnish/default.vcl:/etc/varnish/default.vcl:ro
   networks:
     - docker_network
 webserver:
   image: nginx:latest
   working_dir: /public_html/pwa.docker.com
   hostname: webserver
   volumes:
     - pwa-docker-com:/public_html/pwa.docker.com:nocopy
     # Explanation
     # This is the file to define the nginx conf for Magento (this will just have
     # basic settings and then include Magento provided nginx.conf.sample file)
     - ./.docker/nginx.conf:/etc/nginx/conf.d/default.conf
     - ./var/logs:/var/log/nginx
   networks:
     - docker_network
 php:
   # Explanation
   # Note that this is the only server that is not a stock container like all others.
   # So reverse, webserver, db, phpmyadmin, elasticsearch are just images provided by
   # respective vendors which work without any modifications (separation!) and all we
   # do is configure them if need be via this file or share to them some config files).
   # Great, right?
   # But the php is the server that we need to be Magento compliant, so it needs to have
   # the correct php version and libraries, composer installed and whatever is required
   # by Magento isntallation.
   # Since this is out of scope of this article, try google-ing for magento docker
   # containers or you can just venture to build one yourself via .Dockerfile.
   image: syncit/magento-webserver:1.0
   working_dir: /public_html/pwa.docker.com
   # Explanation
   # Setting the user under which the container will run. This is important because
   # of changing file permissions. If we don’t state the user here, the files will
   # be root owned and any changes to them by container will end up changing that file
   # to be root owned rendering it unchangeable on host system (assumption here is that
   # host is Ubuntu or most of other Linux distros which don’t run under root) and a
   # pain to edit the files. Since www-data will by default have a uid and gid of 33
   # the php container should be build with changed uid/gid to your local user uid/gid.
   # By default, first user created in Ubunut will have 1000 uid/gid. This may be different
   # in your case.
   user: www-data
   ports:
     - "9000:9000"
   volumes:
     - pwa-docker-com:/public_html/pwa.docker.com:nocopy
     - ./.docker/php.ini:/usr/local/etc/php/php.ini
   networks:
     - docker_network
 db:
   image: mariadb:latest
   ports:
     - "3306:3306"
   environment:
     MYSQL_ROOT_PASSWORD: '_root_password_'
   volumes:
     - ./.docker-share/mariadb:/var/lib/mysql
   networks:
     - docker_network
 elasticsearch:
   image: docker.elastic.co/elasticsearch/elasticsearch:6.8.8
   hostname: elasticsearch
   environment:
     - discovery.type=single-node
   ulimits:
     memlock:
       soft: -1
       hard: -1
   volumes:
     - ./.docker/elasticsearch:/usr/share/elasticsearch/data
   ports:
     - 9200:9200
   networks:
     - docker_network
 pma:
   image: phpmyadmin/phpmyadmin
   environment:
     - "PMA_HOST=db"
     - "PMA_PORT=3306"
     - "PMA_ABSOLUTE_URI=http://pma.com"
   volumes:
     - ./.docker/phpmyadmin/sessions:/sessions
   networks:
     - docker_network
volumes:
 pwa-docker-com:
   external: true
networks:
 docker_network:
   driver: bridge
This constellation will behave like this to the outside world:
Since explaining Docker syntax is not in the scope of this article, I’ll just provide the rationale for some of the directives and lines:
- pwa-docker-com for volumes service (near the end of the file, so not volumes directive inside reverse, webserver, etc. Services/containers are used to share the contents of Magento installation files. The contents of directories defined within this volume are automatically synced between the host system and containers that are using the same files. In this case, these containers are webserver and PHP.
More information about the .docker/ folder and its contents.
Reverse Proxy
.docker/reverse-proxy/certs/ – cert and key files used for ssl setup.
.docker/reverse-proxy/config/conf.d/ – contains the Nginx configuration files. Here you can place all Nginx configuration files. They will direct the traffic from the reverse proxy server to internal Docker network servers.
For example, in my setup, the following files are present:
.docker/reverse-proxy/config/conf.d/pwa.docker.com.conf:
upstream varnish {
  server  varnish; #:80; implicitly uses port 80
}

server {
  # listen  80;
  listen  443 ssl;
  server_name   pwa.docker.com;

  include /etc/nginx/conf.d/ssl.conf;

  location / {
    proxy_set_header    Host $host;
    proxy_set_header    X-Real-IP $remote_addr;
    proxy_set_header    X-Forwarded-For $proxy_add_x_forwarded_for;
    proxy_set_header    X-Forwarded-Proto $scheme;
    proxy_pass  http://varnish;
  }
}
Note how the Varnish server is accessed/addressed just with a container hostname.
.docker/reverse-proxy/config/conf.d/default.conf – this is just a default Nginx configuration file. I’m not using so you can leave it as it is.
.docker/reverse-proxy/config/conf.d/pma.conf – Handles access to pma.com server.
upstream pma {
  server        pma;
}

server {
  listen        80;
  server_name   pma.com;

  location / {
    proxy_set_header    Host $host;
    proxy_set_header    X-Real-IP $remote_addr;
    proxy_set_header    X-Forwarded-For $proxy_add_x_forwarded_for;
    proxy_set_header    X-Forwarded-Proto $scheme;
    proxy_pass  http://pma;
  }
}
Again, we access the pma actual server just by its hostname.
.docker/reverse-proxy/config/conf.d/redirect.conf – Just redirect non ssh access to ssh access.
# to automatically redirect to https
server {
  listen  80;

  server_name pwa.docker.com;

  return 301 https://$host$request_uri;
}.docker/reverse-proxy/config/conf.d/ssl.conf
ssl_protocols               TLSv1 TLSv1.1 TLSv1.2;
ssl_certificate             /etc/ssl/private/all.docker.com.cert;
ssl_certificate_key         /etc/ssl/private/all.docker.com.key;
ssl_session_timeout         10m;
ssl_session_cache           shared:SSL:10m;
ssl_session_tickets         off;
Varnish
.docker/varnish/default.vcl – Varnish configuration. To start with, you can make this file contents to be (it needs to exist before starting up Docker setup):
# VCL version 5.0 is not supported so it should be 4.0 even though actually used Varnish version is 5
vcl 4.0;

import std;
# The minimal Varnish version is 5.0
# For SSL offloading, pass the following header in your proxy server or load balancer: 'X-Forwarded-Proto: https'

backend default {
    .host = "webserver";
    .port = "80";
}
Afterward, when setting up Magento, this is the place where you will place Magento generated Varnish file (and consequently reload Varnish configuration). And here is a useful tip about the Varnish configuration. When you generate the file from within Magento, it will contain a section for backend default that will look like this:
backend default {
    .host = "webserver";
    .port = "80";
    .first_byte_timeout = 600s;
    .probe = {
        .url = "/pub/health_check.php";
        .timeout = 2s;
        .interval = 5s;
        .window = 10;
        .threshold = 5;
   }
}
If you’re following Magento best practice guidelines, you’ll have your website pointing to pub/ subdirectory. Now, notice the line which says:
.url = "/pub/health_check.php";You’ll need to manually change that line into:
.url = "/health_check.php";This is because Varnish will try to access the pub/he… But, since you’ve set up pub/ to be the root, it will fail and the whole website will break.
Web Server
.docker/nginx.conf – This file controls the Web Server and handles requests that are forwarded from the reversed proxy through Varnish. This is how it looks like:
upstream fastcgi_backend {
  server    php:9000;
}

server {
    index index.php index.html;
    server_name pwa.docker.com;
    access_log /var/log/nginx/pwa.docker.com.com-access.log;
    error_log /var/log/nginx/pwa.docker.com.com-error.log;

    set $MAGE_ROOT /public_html/pwa.docker.com;

    fastcgi_buffers 16 16k;
    fastcgi_buffer_size 32k;

    include /public_html/pwa.docker.com/nginx.conf.sample;
}
Notice here php:9000 line. It tells the Web Server to use a php-fpm interpreter on the port 9000 of the PHP server. PHP is, of course, the hostname of the PHP container service.
Other
.docker/elasticsearch/nodes – used by Elasticsearch server, just needs to exist on this location.
.docker/phpmyadmin/sessions – used by pma server, just needs to exist on this location.
Magento Setup
In order to set up Magento with this kind of Docker configuration, you need to do the following:
- Download Magento files (preferably via composer) into pwa.docker.com directory which is to be at the same level as docker-compose.yml, docker-sync.yml, and .docker/ files/dirs.
- Add the following line to your /etc/hosts file:
127.0.0.1 pwa.docker.com pma.com - Start the Docker up by running these commands from within ~/Projects/ExtensionDevelopment/ directory:
docker-sync start && docker-compose up -d - If everything goes well, all containers will be downloaded (that may take some time initially) and booted.
- Access through your browser https://pwa.docker.com. You should be greeted with the Magento installation screen. From there on, you need to create a database (you can use pma.com phpmyadmin) for installation. Note that you need to use ‘db’ as a MySQL host when installing.
- The same goes for all other services so you will use ‘elasticsearch’ as Elasticsearch server:
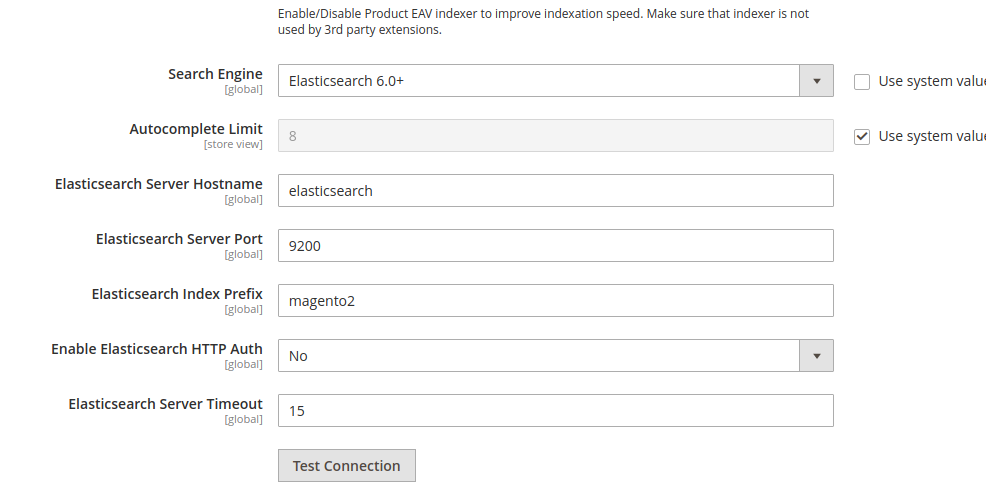
and ‘varnish’ if you need to refer to the Varnish server and ‘webserver’ if you need to refer to Magento Web Server, like when configuring Varnish:
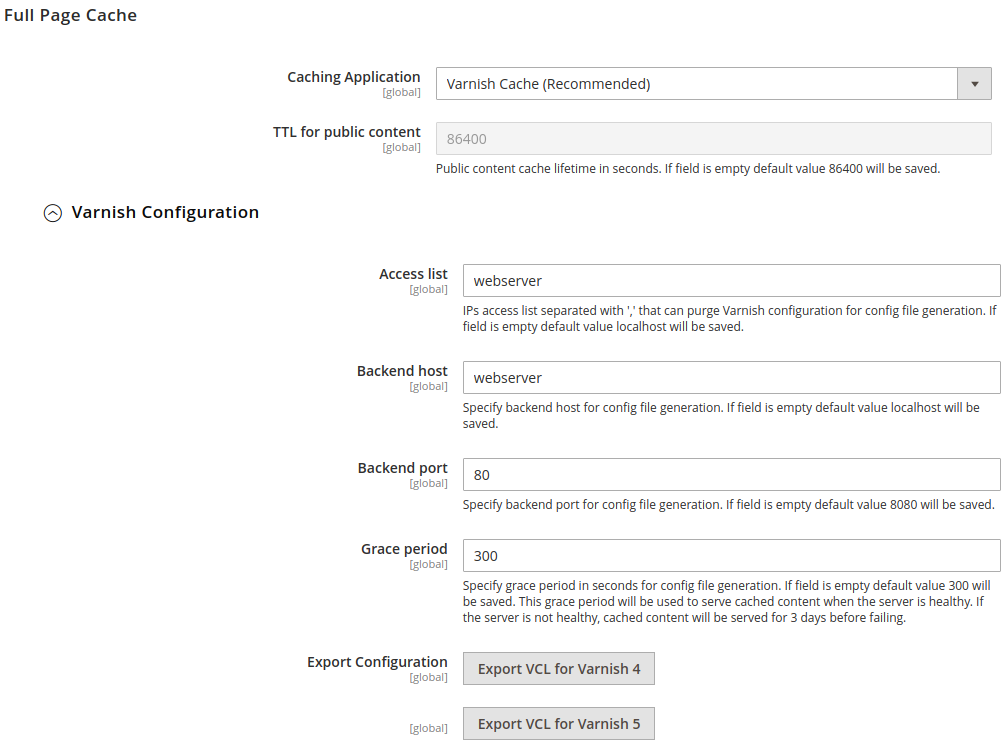
7. Once Varnish is set up, you will need to run one more command to successfully purge the cache when clearing Magento cache:
docker exec -ti extensiondevelopment_php_1 php bin/magento setup:config:set --http-cache-hosts=varnishThis also illustrates how Magento CLI commands are being called in this Docker env. Once you execute the docker-compose up command, a cluster of Docker containers will start. You can review them by running the docker ps command. One of these will be a PHP interpreter container. This container is in charge of running all Magento CLI commands so we can execute it as shown above.
Wrap Up
So, that should be it. Should you have any questions or concerns regarding the Magento development, do not hesitate to contact us at [email protected]
