What is a Store Locator?
Store Locator is an extension that helps you reach the exact location of a physical store more easily.
So, today, we will walk you through the configuration and implementation of custom Store Locator for Magento 2. Moreover, we will review the class for creating a dynamic route mechanics and enabling an additional block on the checkout page.
Finding the nearest store and getting accurate directions are extremely complicated tasks. In order to help you solve them, Syncit Group Company has created a Store Locator extension that can be appropriately customized for the needs of your website.
Store Locator Features
Store Locator extension brings a variety of improvements to both shop owners and their customers. Some of the main features that add to the improvement are the following:
- Store Locator map can be added to any web page, which is extremely convenient since there is no need to return to a specific page in order to find the store you are looking for.
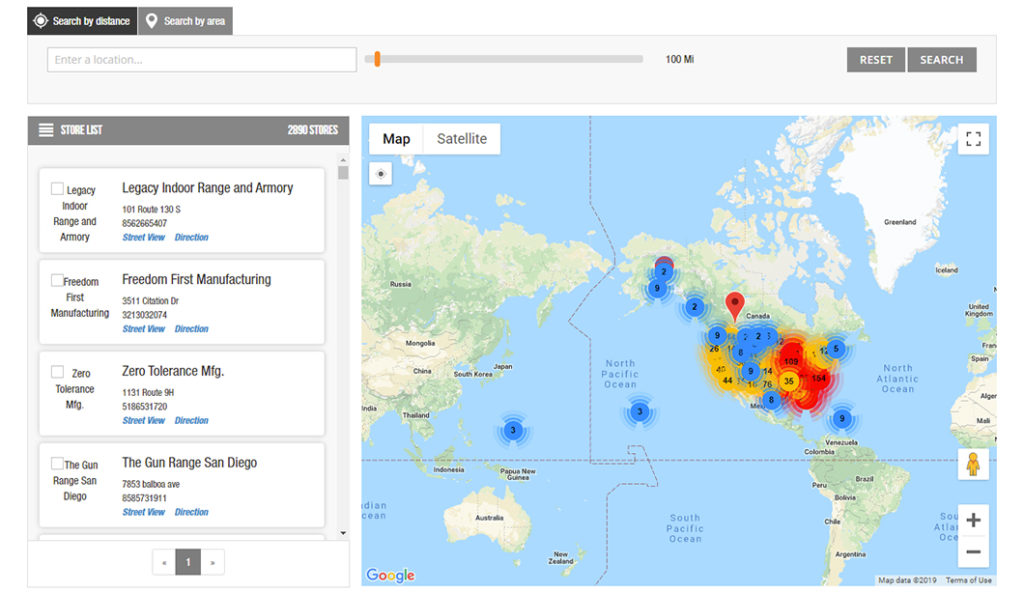
- It provides filters to help you find stores according to certain criteria. You can base your search on the store distance (search radius in kilometers or miles), i.e., name, location, ZIP code, etc. Or you can choose one from the store list.

- Create and import unlimited store locations. Instead of adding one location at a time, you can simply import a CSV or excel file filled with store locations. They will become visible on the Store Locator map.
- It is optimized for mobile use. When you are on the move, which presumably is very often, you have access to the same extension with the same functionalities.
- Set flexible store opening hours & days off. Use a very simple table to set location schedules, i.e., to set the opening hours and days off based on the store’s name and ID. This data is easily manageable. Just pick the store, click “Edit” and change the data in question.
- CSV sample file is available for download. When you click on “Import Stores” in the Store Locator plugin, you instantly get the list of the column for importing. In order to download the file, simply click on the button “Download Sample File” located below the list.
- Get the store’s details in 1 click. If you click on the location pin of the store, you will get all important data related to the store, i.e., Name, Address, ZIP code, Country, State, Website, Phone Number, Email Address, Work Time, Rating, Reviews, and Image Gallery of the store.
- Upload images for any store location. Create customized markers in order for the store locations to stand out on the Store Locator map.
- Multiple Store Views for Store Locator. Thanks to this useful functionality, you will be able to create multiple store views from the admin panel. Different store views can display the same store for different countries but with different languages and currencies.
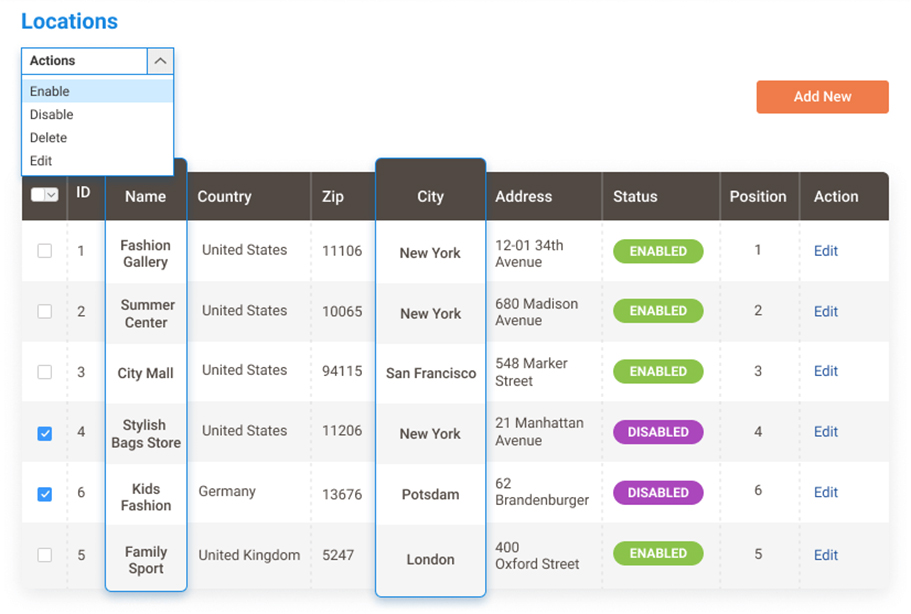
- All store locations can be managed from the admin panel in the form of a grid. Apart from managing the basic store info (i.e., name, ID, country, etc.), you can enable or disable the status of the store and change its position.

Adding a Dynamic Route in Magento 2
Creating a custom router can be very useful when you want to separate some business logic that can be applied on the same route (URL) without redirecting it to different routes inside other controllers.
A lot of Magento 2 extensions, like subscription and blog modules, allow merchants to configure the page URL in the admin panel within the Stores > Configuration section.
So, we have added this functionality by creating a custom Magento 2 Router class. It allows merchants to add a dynamic route in the M2 admin panel.
Now, let’s focus on the steps that are necessary in order to allow a dynamic route that can be configured in the Stores > Configuration section.
Firstly, you need to add two necessary files for the custom module creation – registration.php and module.xml files.
registration.php
File: app/code/Vendor/Module/registration.php
<?php
   \Magento\Framework\Component\ComponentRegistrar::register(
       \Magento\Framework\Component\ComponentRegistrar::MODULE,
       'SyncIt_StoreLocator',
       __DIR__
   );
module.xml
File: app/code/Vendor/Module/etc/module.xml
<?xml version="1.0"?>
<config xmlns:xsi="http://www.w3.org/2001/XMLSchema-instance" xsi:noNamespaceSchemaLocation="urn:magento:framework:Module/etc/module.xsd">
  <module name="SyncIt_StoreLocator" setup_version="0.0.1"/>
</config>
system.xml
In the system.xml file, you can allow the merchant to configure a custom URL from the admin panel.
File: app/code/Vendor/Module/etc/adminhtml/system.xml
<?xml version="1.0"?>
<config xmlns:xsi="http://www.w3.org/2001/XMLSchema-instance" xsi:noNamespaceSchemaLocation="urn:magento:module:Magento_Config:etc/system_file.xsd">
  <system>
     <section id="syncit_storelocator" translate="label" type="text" sortOrder="10" showInDefault="1" showInWebsite="1" showInStore="1">
        <label>Store Locator</label>
        <tab>syncit</tab>
        <resource>SyncIt_StoreLocator::storelocator</resource>
        <group id="general" translate="label" type="text" sortOrder="10" showInDefault="1" showInWebsite="1" showInStore="1">
           <label>General</label>
           <field id="route" translate="label" type="text" sortOrder="20" showInDefault="1" showInWebsite="1" showInStore="1" canRestore="1">
              <label>Route</label>
           </field>
        </group>
     </section>
  </system>
</config>
routes.xml
In the routes.xml file, you should define the default route.
<?xml version="1.0" encoding="UTF-8"?>
<config xmlns:xsi="http://www.w3.org/2001/XMLSchema-instance"
       xsi:noNamespaceSchemaLocation="urn:magento:framework:App/etc/routes.xsd">
   <router id="standard">
       <route id="storelocator" frontName="storelocator">
           <module name="SyncIt_StoreLocator"/>
       </route>
   </router>
</config>
Controller class
Index Controller class will be used to handle the route.
<?php
namespace SyncIt\StoreLocator\Controller\Index;

use Magento\Framework\App\Action\Action;
use Magento\Framework\App\Action\Context;
use Magento\Framework\View\Result\PageFactory;
use SyncIt\StoreLocator\Helper\Data as Helper;

class Index extends Action
{
   /**
    * @var PageFactory
    */
   protected $resultPageFactory;

   /**
    * @var Helper
    */
   protected $_helper;
   /**
    * Index constructor.
    * @param Context $context
    * @param PageFactory $resultPageFactory
    * @param Helper $helper
    */
   public function __construct(
       Context $context,
       PageFactory $resultPageFactory,
       Helper $helper)
   {
       parent::__construct($context);
       $this->resultPageFactory = $resultPageFactory;
       $this->_helper = $helper;
   }

   /**
    * @return \Magento\Framework\App\ResponseInterface|\Magento\Framework\Controller\ResultInterface|\Magento\Framework\View\Result\Page
    */
   public function execute()
   {
       $pageTitle = $this->_helper->getPageTitleStoreLocator();
       $page = $this->resultPageFactory->create();
       $page->getConfig()->getTitle()->set($pageTitle);

       // Add breadcrumb
       /** @var \Magento\Theme\Block\Html\Breadcrumbs */
       $breadcrumbs = $page->getLayout()->getBlock('breadcrumbs');
       $breadcrumbs->addCrumb(
           'home',
           [
               'label' => __('Home'),
               'title' => __('Home'),
               'link' => $this->_url->getUrl('')
           ]
       );
       $breadcrumbs->addCrumb(
           'SyncIt_StoreLocator',
           [
               'label' => $pageTitle,
               'title' => $pageTitle
           ]
       );

       return $page;
   }
}
di.xml
Router class should be defined in di.xml file within the routerList argument.
<?xml version="1.0" encoding="UTF-8"?>
<config xmlns:xsi="http://www.w3.org/2001/XMLSchema-instance" xsi:noNamespaceSchemaLocation="urn:magento:framework:ObjectManager/etc/config.xsd">
   <type name="Magento\Framework\App\RouterList">
       <arguments>
           <argument name="routerList" xsi:type="array">
               <item name="storelocator" xsi:type="array">
                   <item name="class" xsi:type="string">SyncIt\StoreLocator\Controller\Router</item>
                   <item name="disable" xsi:type="boolean">false</item>
                   <item name="sortOrder" xsi:type="string">60</item>
               </item>
           </argument>
       </arguments>
   </type>
</config>
Router class
After that, you need to add the Router class. This class should implement the interface, and subsequently contain a match() method.
Of course, the module path of the route is checked again in the route added to the admin. Provided that it matches, the next step would be to set the module, controller, and action names of the request to customroute, index, and index, respectively.
This will allow the controller class defined above to handle the route.
<?php
namespace SyncIt\StoreLocator\Controller;

use Magento\Framework\App\ActionFactory;
use Magento\Framework\App\RequestInterface;
use Magento\Framework\App\RouterInterface;
use Magento\Framework\DataObject;
use Magento\Framework\Event\ManagerInterface as EventManagerInterface;
use Magento\Framework\Url;
use SyncIt\StoreLocator\Helper\Data as CustomRouteHelper;

class Router implements RouterInterface
{
   /**
    * @var bool
    */
   private $dispatched = false;

   /**
    * @var ActionFactory
    */
   protected $actionFactory;

   /**
    * @var EventManagerInterface
    */
   protected $eventManager;

   /**
    * @var CustomRouteHelper
    */
   protected $helper;

   /**
    * Router constructor.
    *
    * @param ActionFactory $actionFactory
    * @param EventManagerInterface $eventManager
    * @param CustomRouteHelper $helper
    */
   public function __construct(
       ActionFactory $actionFactory,
       EventManagerInterface $eventManager,
       CustomRouteHelper $helper
   ) {
       $this->actionFactory = $actionFactory;
       $this->eventManager = $eventManager;
       $this->helper = $helper;
   }

   /**
    * @param RequestInterface $request
    * @return \Magento\Framework\App\ActionInterface|null
    */
   public function match(RequestInterface $request)
   {
       /** @var \Magento\Framework\App\Request\Http $request */
       if (!$this->dispatched) {
           $identifier = trim($request->getPathInfo(), '/');
           $this->eventManager->dispatch('core_controller_router_match_before', [
               'router' => $this,
               'condition' => new DataObject(['identifier' => $identifier, 'continue' => true])
           ]);

           $identifier = urldecode($identifier);
           $route = $this->helper->getModuleRoute();

           if ($route !== '' && strpos($identifier, $route) !== false) {
               $identifierPieces = explode("/", $identifier);

               if ($identifier == $route) {
                   $request->setModuleName('storelocator')
                       ->setControllerName('index')
                       ->setActionName('index');
                   $request->setAlias(Url::REWRITE_REQUEST_PATH_ALIAS, $identifier);
                   $this->dispatched = true;
                   return $this->actionFactory->create(
                       'Magento\Framework\App\Action\Forward',
                       ['request' => $request]
                   );
               }

               $city = '';
               if (isset($identifierPieces[1])) {
                   $city = $identifierPieces[1];
               }
               //This part of the code shows how to forward an additional parameter to the controller which is triggered from the custom route.
               $request->setModuleName('storelocator')
                   ->setControllerName('index')
                   ->setActionName('view')
                   ->setParam('city', $city);
               $request->setAlias(Url::REWRITE_REQUEST_PATH_ALIAS, $identifier);
               $this->dispatched = true;

               return $this->actionFactory->create(
                   'Magento\Framework\App\Action\Forward'
               );
           }

           return null;
       }
   }
}
customroute_index_index.xml
Lastly, define a customroute_index_index.xml layout file. Its job will be to render a template with some content.
<?xml version="1.0" encoding="UTF-8"?>
<page xmlns:xsi="http://www.w3.org/2001/XMLSchema-instance"  layout="1column" xsi:noNamespaceSchemaLocation="../../../../../../../lib/internal/Magento/Framework/View/Layout/etc/page_configuration.xsd">

 <body>
<referenceContainer name="content">
   <block class="SyncIt\StoreLocator\Block\Stores" name="store.list" template="SyncIt_StoreLocator::stores.phtml">
       <block class="Magento\Theme\Block\Html\Pager" name="store.list.pager"/>
   </block>
</referenceContainer>
<block class="SyncIt\StoreLocator\Block\Stores" name="map" template="SyncIt_StoreLocator::map.phtml">
   <block class="Magento\Theme\Block\Html\Pager" name="store.list.pager"/>
</block>

 </body>
</page>
<div class="content">
    <p> <?= echo __('Here  we can render out stores'); ?> </p>
</div>
And that’s it! So, whichever route you define in the admin, the Controller class will handle it. Also, it will render the content from the template defined in the layout file.
Conclusion
Every eCommerce store ought to have a customized Store Locator. With it, you can improve store management. Moreover, you will ensure your customers’ trust thanks to this user-friendly extension. So, make sure not to miss out on the opportunity to enjoy the benefits of this extension.
Of course, feel free to contact us at [email protected] for any questions. We will gladly offer you a helping hand for any kind of M2 service.
Sources
