In this guide, I will show you how to set up a complete scalable solution for a Magento 2 website on Ubuntu 16.04. You will use Apache web server, MariaDB for database, Redis for sessions, Varnish cache to lower load on web servers, and load balancer to balance between multiple machines.
Overview
This guide consists of the following stages:
- Configuring Ubuntu 16.04 User
- Setting up a Web Server (Apache)
- MariaDB 10.2
- PHP 7.1
- PHP 7.1-FPM
- Composer
- Magento
- Load Balancer Machine
- Redis Instance
- Varnish Instance
It is written in a format that enables you to copy/paste commands in your terminal for certain section(s). If you have already finished making some parts of this architecture, feel free to skip that step.
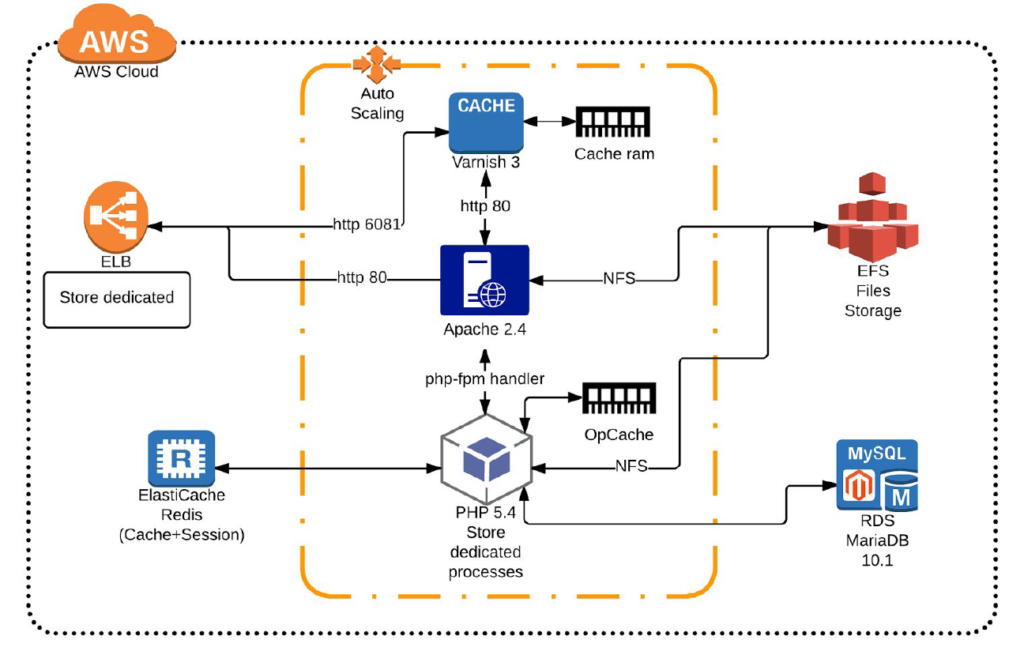
The picture below shows the complete architecture of setting up a web server on AWS with all the best features of cloud hosting and optimization. So, I will show you how to set up all of these on your standalone machines except EFS (NFS).
NFS is a network file storage that enables you to share files between multiple machines in real-time. It is very slow from my perspective, but it is excellent for storing media, documents, or files that you don’t have to modify, read, or write.
For Magento, it means that only pub/media folder you can put on NFS. Everything else has to be on local instance because when you execute php bin/magento setup: upgrade or php bin/magento setup:di:compile it will take forever to finish execution.
So, if you want to have multiple web servers to optimize load and scale your application, you must have scripts for syncing files between these machines (files on local storage like app, lib, bin, generated).
Configuring Ubuntu 16.04 User
Before you begin the configuration of a web server, you have to create a user that will be used for ssh, as well as by Apache for easier file maintenance after executing CLI Magento commands. If you don’t change the user, the default Apache user and the group will be www-data and www-data.
After the execution of deploy commands, the owner of the files is going to be ssh user. Of course, the group is going to be the same as the owner. Magento will not work properly since it would not be able to create cache folders and generate new files.
Firstly, create a new user on Ubuntu:
sudo adduser ubuntu-userSecondly, add the user to group www-data:
sudo usermod -aG sudo ubuntu-userFinally, add user to sudoers (this is not recommended):
sudo usermod -aG sudo ubuntu-userSetting up a Web Server (Apache)
Apache is the most used web server in the world. It is developed by the Apache Software Foundation. It can be used as a proxy or serving PHP applications installed on a machine.
You will be using Apache only for HTTP requests. HTTPs will be stripped on load balancer instance. Because you will use Varnish, this web server is next incall if Varnish doesn’t cache page.
sudo apt-get install apache2
sudo a2enmod rewrite
sudo nano /etc/apache2/envvars
Change APACHE_RUN_USER from www-data to wanted username.
export APACHE_RUN_USER=ubuntu-userAfter that, you can execute CLI commands and do not worry about file permissions.
Another option is to add a user to the www-data group and set the primary group for that user to be www-data. That means when the ssh user uploads new files, Apache can read it. For some files, it will be necessary to change permissions for the group user.
In order to create a virtual host, you have to create a configuration file to tell Apache which folder will be served. You ought to be careful with this configuration.
I am not putting ServerName in configuration so every request will be served with this configuration file and it will conflict with others if they exist.
If you want to, you can uncomment the ServerName directive and put your domain name instead. After that, you can have multiple virtual hosts set up.
sudo nano /etc/apache2/sites-available/example-website.conf
<VirtualHost *:80>
   ServerAdmin webmaster@localhost
   DocumentRoot /var/www/example-website/html/
   #ServerName www.example.com
   ErrorLog /var/www/example-website/logs/error.log
   CustomLog /var/www/example-website/logs/access.log combined
   <Directory /var/www/example-website/html/>
      Options Indexes FollowSymLinks MultiViews
      AllowOverride All
      Require all granted
   </Directory>
</VirtualHost>
After configuration file creation we have to disable the default configuration and enable the one that you created with the code above.
sudo a2dissite 000-default.conf
sudo a2ensite example-website.conf
Then, create a directory from which Magento will be served:
sudo mkdir -p /var/www/example-website/html After that, create a directory for web server logs:
sudo mkdir -p /var/www/example-website/logsFinally, restart Apache after creating folders. Our web server is ready for use.
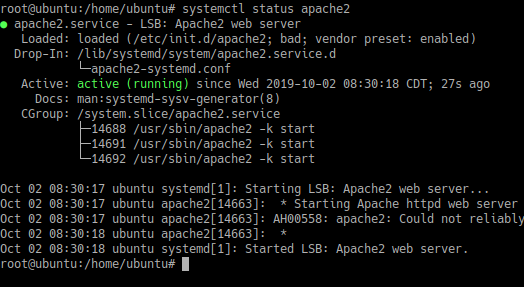
sudo systemctl restart apache2Of course, check if apache2 is running with this command:
sudo systemctl status apache2You should see something like this:
Before testing, you can create a sample index.html file in the website directory.
nano /var/www/example-website/html/index.html

<h1>Example website </h1>
In order to find out the public IP, execute one of the commands on the web server in terminal:
curl ifconfig.me
curl icanhazip.com
curl ipecho.net/plain
curl ifconfig.co
You can test it in the browser by typing http://webserver-ip-address. If you see the content of index.html it was successfully configured by the web server.
MariaDB 10.2
In order to install MariaDB, you have to install a software-properties-common package.
sudo apt install software-properties-commonImport keys and source for installing MariaDB from their servers.
sudo apt-key adv --recv-keys --keyserver hkp://keyserver.ubuntu.com:80 0xF1656F24C74CD1D8
sudo add-apt-repository 'deb http://mirrors.coreix.net/mariadb/repo/10.2/ubuntu xenial main'
Then you can start installing the MariaDB server.
sudo apt update
sudo apt install -y mariadb-server
If you want just MariaDB client use the command below. In our case, we will install this on the web server instance.
sudo apt install mariadb-clientThese commands should be executed, just change the parameters for the database name and password (identified by).
mysql -u root -p
MariaDB [(none)]> create database example;
MariaDB [(none)]> GRANT ALL ON example.* TO mysql-user@localhost IDENTIFIED BY examplepassword; //or different pw in IDENTIFIED BY, this is just on first create user for db, further using is without IDENTIFIED BY
MariaDB [(none)]> FLUSH PRIVILEGES;
MariaDB [(none)]> exit
Test MySQL username and password:
mysql -u mysql-user -p //pw is examplepassword or different (look at the command above).
MariaDB enabling remote access:
sudo nano /etc/mysql/mariadb.conf.d/50-server.cnf

bind-address = 0.0.0.0
sudo systemctl restart mariadb.service
sudo netstat -anp | grep 3306
GRANT ALL ON example.* TO 'mysql-user'@'remote-ip-for-access' IDENTIFIED BY examplepassword;
flush privileges;Remote IP can be public IP, private IP, or localhost, depending on how you want to access the database.
Also, you have to allow a remote IP address in your firewall if you are using any.
sudo ufw allow from ‘remote-ip’ to any port 3306After that, test the connection with this command executed on the machine
‘Remote-ip-for-access‘.
mysql -u mysql-user -p -h ‘mariadb-host-ip’In case you cannot connect to the Maria DB machine, check firewalls, or execute the commands from the above again. If you have put a private IP and now you are trying to connect through the public IP, it will not work. You must use the private IP in order to connect to the machine.
PHP 7.1
Installing PHP 7.1 and additional packages for version. This was required by Magento 2.2.8, and it would not work with a newer version. If you are using Magento 2.3 or higher version, all of these versions can be replaced with php7.2-*. Only, php7.2-mcrypt doesn’t exist, so remove that package from command and execute.
sudo apt-get install software-properties-common
sudo add-apt-repository ppa:ondrej/php
sudo apt-get update
sudo apt-get install php7.1
sudo apt install php7.1 php7.1-curl php7.1-mysql libapache2-mod-php7.1
php7.1-bcmath php7.1-curl php7.1-gd php7.1-intl php7.1-mbstring php7.1-mcrypt
php7.1-soap php7.1-xml php7.1-xsl php7.1-zip php7.1-json php7.1-iconvIncrease max execution time if you have large PHP scripts in both cli and apache configuration files.
sudo nano /etc/php/7.1/cli/php.inimax_execution_time = 1800sudo nano /etc/php/7.1/apache2/php.inimax_execution_time = 1800
memory_limit = 2048MPHP 7.1-FPM
PHP-FPM will increase the web server’s performance by 300%. Also all of bigger hosting companies using PHP-FPM on their web servers.
To install PHP-FPM, execute the commands below:
sudo apt-get install libapache2-mod-fastcgi
sudo apt install php7.1 php7.1-fpm php7.1-common
sudo a2enmod actions fastcgi alias proxy_fcgiApache by default uses the mod_php module. In order to switch the web server to use PHP-FPM, you have to edit the configuration file for the website (virtual host).
sudo nano /etc/apache2/sites-available/example-website.confAdd these lines inside the virtual host tag:
<FilesMatch \.php$>
    SetHandler "proxy:unix:/var/run/php/php7.1-fpm.sock|fcgi://localhost/"
</FilesMatch>
After editing, the file looks like this:
<VirtualHost *:80>
   ServerAdmin webmaster@localhost
   DocumentRoot /var/www/example-website/html/
   #ServerName www.example.com
   ErrorLog /var/www/example-website/logs/error.log
   CustomLog /var/www/example-website/logs/access.log combined
   <Directory /var/www/example-website/html/>
      Options Indexes FollowSymLinks MultiViews
      AllowOverride All
      Require all granted
   </Directory>
   <FilesMatch \.php$>
        SetHandler "proxy:unix:/var/run/php/php7.1-fpm.sock|fcgi://localhost/"
   </FilesMatch>
</VirtualHost>
After changing this, change the permissions of the FastCGI folder so Apache can work properly.
sudo chmod -R 775 /var/lib/apache2/fastcgi
sudo systemctl restart apache2.service
Change user to ubuntu-user in the file found on this path:
sudo nano /etc/php/7.1/fpm/pool.d/www.confSome tweaks for PHP-FPM, similar to PHP.
sudo nano /etc/php/7.1/fpm/php.inimemory_limit 2048M
max_execution_time 1800
zlib.output_compression = On
cgi.fix_pathinfo=1
opcache.enable=1
opcache.enable_cli=1
opcache.memory_consumption=2048
opcache.max_accelerated_files=100000Restarting PHP-FPM and Apache service after configurations to apply changes.
sudo systemctl restart php7.1-fpm
sudo systemctl restart apache2.service
if you getting permission denied on /var/lib/php/sessions
sudo chown -R ubuntu-user:www-data /var/lib/php/sessionsrestart server
reboot nowComposer
Composer is a tool for dependency management in PHP. It allows you to declare the libraries your project depends on and it manages (installs/updates) them for you.
To download Magento via Composer, you have to install Composer on your computer first. This can be done by downloading the installer and then moving it to the folder from where it can be executed globally.
curl -sS https://getcomposer.org/installer | php
sudo mv composer.phar /usr/local/bin/composer
If you want, you can create an auth.json. Composer uses it for authorization on Magento repositories when you try to download the newest packages and dependencies.
sudo mkdir /home/ubuntu-user/.composer
sudo nano /home/ubuntu-user/.composer/auth.json
Then, add these lines to the file.
{
   "github-oauth": {
      "github.com": "<github-token>"
   },
   "http-basic": {
      "repo.magento.com": {
         "username": "<magento-public-key>",
         "password": "<magento-private-key>"
      }
   }
}
Finally, change folder ownership to Ubuntu user.
sudo chown ubuntu-user:www-data -R /home/ubuntu-user/.composerMagento
You can download Magento with curl, and in case you did not install curl, execute the following command:
sudo apt install -y curlTo download installations for Magento you must have an account. Click on the link below to find your TOKEN and ID for downloading.
https://account.magento.com/downloads/token/
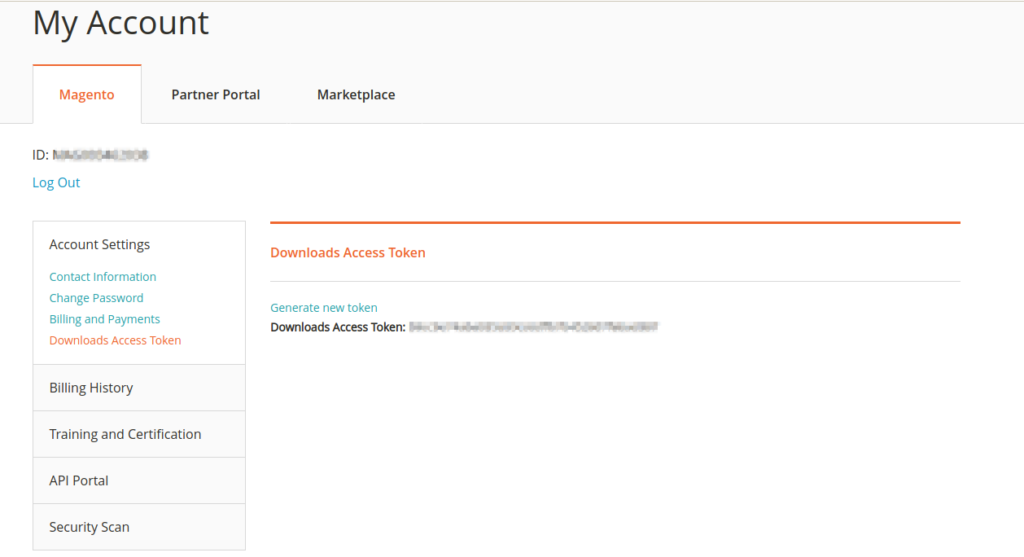
Log in with ssh user who is in the same user group as Apache or Apache user who is the same as ssh user.
In order to find an available version you can execute this command:
curl -k
https://<ID>:<TOKEN>@www.magentocommerce.com/products/downloads/info/filter/version/2.2.5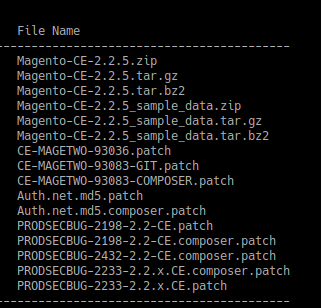
In order to download the file, you need to execute this command with the file name copied from the previous command.
curl -k -O
https://<ID>:<TOKEN>@www.magentocommerce.com/products/downloads/file/Magento-CE-2.1.9%2BSamples.tar.gz
Then, extract the file, change ownership if you had logged in as a different user as Apache using, and adapt permissions of files and folders.
tar -zxvf Magen*.tar.gz -C /var/www/ubuntu-user/html/cd /var/www/ubuntu-user/html
sudo chown -R ubuntu-user:www-data .
sudo find . -type d -exec chmod 775 {} \;
sudo find . -type f -exec chmod 664 {} \;Now, let’s set Linux crons for this Magento website. In case you have multiple web servers, you have to do this only on one of your choosing.
sudo crontab -u ubuntu-user -e* * * * * /usr/bin/php /var/www/ubuntu-user/html/bin/magento cron:run | grep -v 'Ran jobs by schedule' >> /var/www/ubuntu-user/html/var/log/magento.cron.log
* * * * * /usr/bin/php /var/www/ubuntu-user/html/update/cron.php >> /var/www/ubuntu-user/html/var/log/update.cron.log
* * * * * /usr/bin/php /var/www/ubuntu-user/html/bin/magento setup:cron:run >> /var/www/ubuntu-user/html/var/log/setup.cron.logLoad Balancer Machine
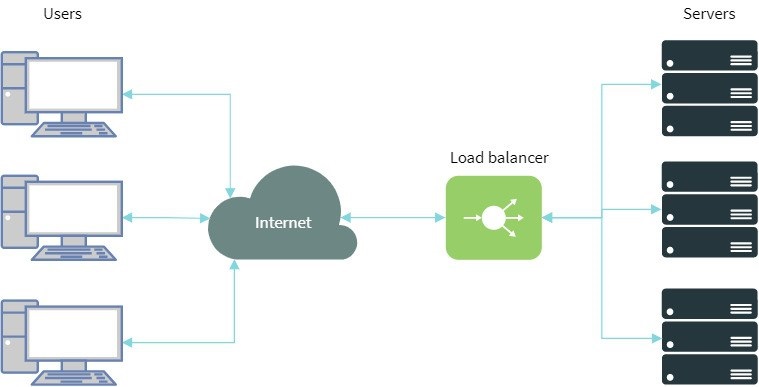
In this section, it is necessary to install Nginx. With this web server, you will proxy requests to varnish machines or web servers with the Magento application, depending on your architecture.
To set up the load balancer, you need to install Nginx with the following commands and apply the configuration file from the example.
sudo add-apt-repository ppa:nginx/stable
sudo apt-get update
sudo apt-get install nginx
cd /etc/nginx/
rm /etc/nginx/sites-enabled/default
sudo nano /etc/nginx/conf.d/load-balancer.conf
Insert the following configuration in the file:
# Define which servers to include in the load balancing scheme.
# It's best to use the servers' private IPs for better performance and security.
# You can find the private IPs at your UpCloud Control Panel Network section.

upstream backend_unsecure {
   ip_hash;
   server ip-address-first-varnish-server:80;
   server ip-address-second-varnish-server:80;
   keepalive 64;
}


# This server accepts all traffic to port 80 and passes it to the upstream.
# Notice that the upstream name and the proxy_pass need to match.

proxy_redirect          off;
proxy_set_header        X-Real-IP               $remote_addr;
proxy_set_header        X-Forwarded-For         $proxy_add_x_forwarded_for;
proxy_set_header        X-Forwarded-Proto       $scheme;
proxy_set_header        Host                    $http_host;
proxy_set_header        X-NginX-Proxy           true;
proxy_set_header        Connection "";
proxy_http_version      1.1;
proxy_cache_key         sfs$request_uri$scheme;


server {
   listen 80;
        access_log /var/log/nginx-access-load-balancer.log;
        error_log /var/log/nginx-error-load-balancer.log warn;
   location / {
      proxy_pass http://backend_unsecure;
   }
}
systemctl enable nginx
systemctl start nginxRedis Instance
Redis is an in-memory caching mechanism that can be used for storing sessions, pages, or any kind of data you need storing. This is a convenient way for sharing sessions or data between multiple web server instances. You need this because the load balancer will not pass your requests to one server but to all servers by one of the chosen methods for balancing requests.
You could set an option on AWS so customers are going to be rerouted only to the server which was hit the first time. However, this is not recommended because it can crash the web server with too many requests. Because of all these reasons, it is recommended to use Redis for sharing sessions.
Installing Redis on Ubuntu 16.04 is pretty standard. Just hit the commands below.
sudo apt-get update
sudo apt-get upgrade
sudo apt-get install redis-server
After that, enable the service to auto start on system reboot.
sudo systemctl enable redis-server.serviceIncrease available memory for Redis if you want. Variable ‘maxmemory-policy’ says to Redis to choose to remove any key if memory is full.
sudo vim /etc/redis/redis.confmaxmemory 256mb
maxmemory-policy allkeys-lruIn case you want to allow remote connections to Redis instance, you need to change the configuration file.
bind 0.0.0.0

sudo systemctl restart redis-server.service
Web Server Configuration
Log in with ssh on web server instance(s) and execute this command or just on one and sync app/etc/env.php file with other instances.
bin/magento setup:config:set --session-save=redis
--session-save-redis-host=ip-address-of-redis-instance
--session-save-redis-log-level=3 --session-save-redis-db=2
You can find more about configuration on Magento docs page.
Varnish Instance
Varnish is an application for caching web pages and it’s always before web server with Magento application. It works only with an HTTP request. If you have an SSL certificate installed, you have to strip SSL and the proxy request to this Varnish instance.
Installing Varnish on Ubuntu 16.04 can be done by executing one cli command. After that, you have to enable this service and start it.
sudo apt-get install varnish
sudo systemctl stop varnish.service
sudo systemctl start varnish.service
sudo systemctl enable varnish.service
Then, configure Varnish To Use Port 80.
sudo nano /etc/default/varnish
## Alternative 2, Configuration with VCL
#
# Listen on port 6081, administration on localhost:6082, and forward to
# one content server selected by the vcl file, based on the request.
#
DAEMON_OPTS="-a :80 \
-T localhost:6082 \
-f /etc/varnish/default.vcl \
-S /etc/varnish/secret \
-s malloc,256m"
Editing /etc/default/varnish file will not give the wanted results. But, it will not accept this configuration on Ubuntu 16.04 for some reason. So, if you have this kind of problem, just execute the following commands.
netstat -pltnuIf Varnish uses port 6081 instead 80 in netstat, execute these commands:
- to find the service file execute:
sudo grep -R 'ExecStart=/usr/sbin/varnishd' /etc/- to change port from default 6081 to 80, execute:
sudo nano /etc/systemd/system/multi-user.target.wants/varnish.service
change -a :6081 to -a :80
In this file, you will also have to change the configuration file for Varnish which you will generate later.
You can only change the configuration file and port or you can copy the whole line in your service file.
sudo nano /etc/systemd/system/multi-user.target.wants/varnish.service
"-a :80 -T localhost:6082 -f /etc/varnish/magento2-varnish.vcl -p thread_pools=4 -p thread_pool_max=1500 -p connect_timeout=300 -p http_resp_hdr_len=65536 -p http_resp_size=98304 -S /etc/varnish/secret -s malloc,2G"
The default Varnish configuration is not optimized and prepared for Magento 2. So, what you need to do is to log in with ssh on the web server where Magento 2 is installed and execute this command in Magento 2 project root directory:
php bin/magento varnish:vcl:generate > magento2-varnish.vclThis command will generate a Varnish configuration with the name ‘magento2-varnish.vcl’. After that, transfer that file to varnish instance on this path:
/etc/varnish/magento2-varnish.vcl

sudo nano /etc/varnish/magento2-varnish.vcl
Then, in the backend default section, change the IP address to the web server address.
# Default backend definition. Set this to point to your content server.
backend default {
.host = "127.0.0.1";
.port = "80";
}
Log in with ssh on Magento 2 web server instance. Then, execute the next command, and change IP and port before executing it.
php bin/magento setup:config:set --http-cache-hosts=127.0.0.1:6081Restarting Varnish automatically deletes the cache.
/etc/init.d/varnish restartConclusion
Of course, all of these configurations are not always necessary. Depending on your website and the number of customers, you will optimize the website accordingly.
This example of the setup is intended for big websites that have a lot of customers. These can easily be scaled up if web servers cannot handle that kind of load.
On the other side, this can be too expensive for some business owners, so all of these configurations are usually gathered on one machine and just increase the number of CPUs, RAM, or storage. So if you are reading this, you obviously need this kind of architecture.
Sources

I have been looking for a post like this for weeks, thank you.
[…] Should you need a detailed guide for installing Magento 2 on Ubuntu 16.04, you should read one of our previous blog posts. […]