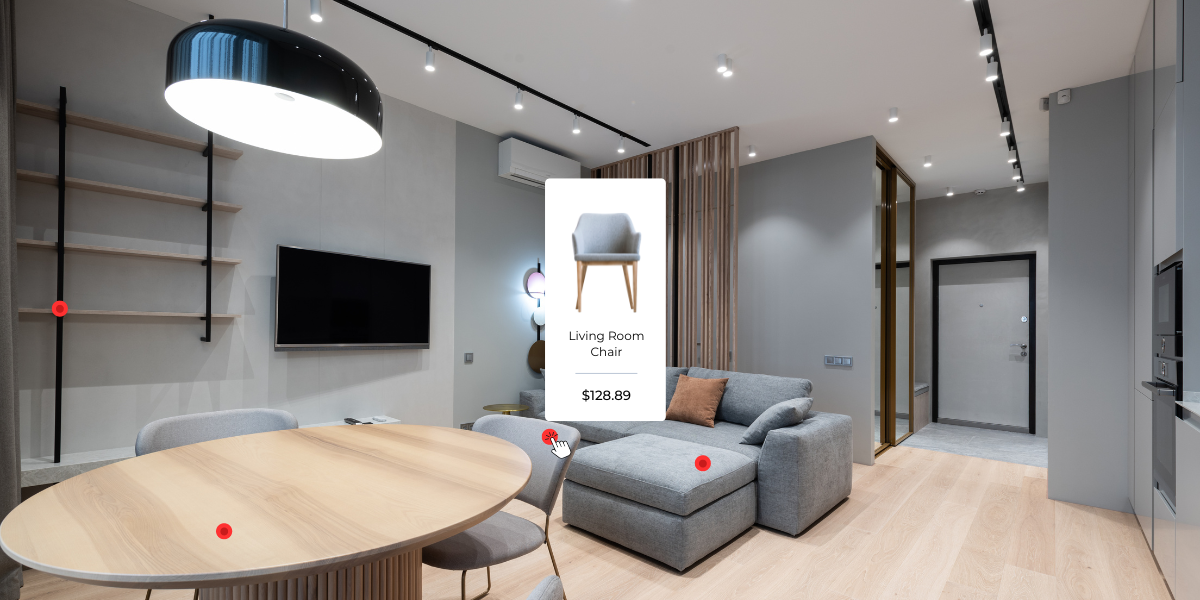
Are you a Magento 2 web store owner? Do your products include clothes, accessories, or furniture? Then implementing ‘Shop the Look’ functionality is simply a must!
What is Shop The Look?
Shop the Look is an extension for Magento 2 that pulls together the concept of selling a complete look. It is widely used in fashion, apparel, and furniture industries.
You can use it to add a style of a model that contains several products (shoes, pants, shirts, jewelry, etc.) or a complete kitchen with products. e.g., chairs, tables, sideboards, buffets, food pantries, and wine racks.
Key Features
Key features of Shop the Look are the following:
- The most suitable product for fashion, furniture, firearms, PC and other hardware manufacturers that sell whole products with many components, etc.
- A special visual presentation (the products can be attached to any kind of image)
- Easily add a look with its pins and products
- Easily add a widget to any CMS page that contains the Shop the Look (further in the text as ‘look’)
Benefits
The benefits of Shop the Look include:
- Easy to design one “custom” product with multiple products (not really a custom product, but its image)
- Increase item stock
- Helps customers purchase a complete matching fashion style or set of furniture
- Reduces the error of mismatched purchases and individual purchase stress
Creating Shop the Look
Before we begin, you need to download a JS library called easypin.js which can be found on https://github.com/atayahmet/jquery.easypin. This library will be used for rendering images (looks) on the website. So, let’s start with the basics.
- In the store configuration, we will have one input for enabling/disabling the extension
- On the admin side, we will have a grid with the “Looks” listed
Let’s sum up the rough work that needs to be done:
- Create a database table that stores data.
- Add an admin grid.
- Add an image with pins that will connect the product with the image.
- The “Save” button saves all information within the database. We will use controllers as much as we can so we will follow Magento standards.
- Create the widget for displaying the ‘Look’ on the CMS page.
- Display items on the frontend. Just pull out and process the data from the database.
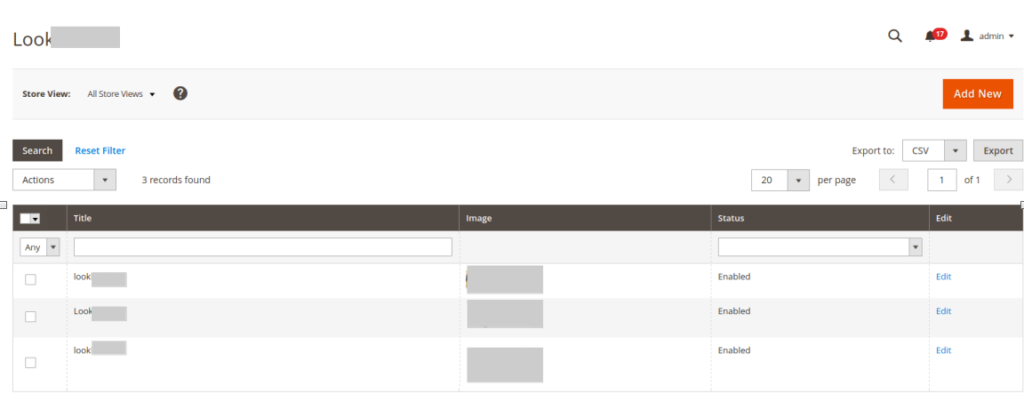
Firstly, make a grid that will handle listing items from the database. Start with creating a Block file called Grid.php that will contain basic grid elements, actions, etc. Please take a close look at the examples below.
Preparing Columns
protected function _prepareColumns()
{
//add column name as text type
   $this->addColumn(
       'title',
       [
           'header' => __('Name'),
           'type' => 'text',
           'index' => 'title',
           'header_css_class' => 'col-title',
           'column_css_class' => 'col-title',
       ]
   );
$this->addColumn(
   'image',
   [
       'header' => __('Image'),
       'class' => 'img',
       'width' => '150px',
       'filter' => false,
       'renderer' => {Vendor}\{Module}\Block\Adminhtml\Helper\Grid\Image',
   ]
);

...
$this->addExportType('*/*/exportCsv’, __('CSV'));
$this->addExportType('*/*/exportXml', __('XML'));
$this->addExportType('*/*/exportExcel', __('Excel'));

}
In the last three lines of the prepareColumns function, we’ve added export types. They can be handy when it comes to a large number of ‘Looks’.
Mass Action
protected function _prepareMassaction()
{
   $this->setMassactionIdField('{identifierName}_id');
   $this->getMassactionBlock()->setFormFieldName({identifierName});
//add item
   $this->getMassactionBlock()->addItem(
      'delete',
      [
          'label' => __('Delete'),
          'url' => $this->getUrl('{identifierName}/*/massDelete'),
          'confirm' => __('Are you sure?'),
      ]
   );

   …

}
Of course, this block has to be backed up with a layout, for example, lookbook_index_grid.xml
<layout xmlns:xsi="http://www.w3.org/2001/XMLSchema-instance"
       xsi:noNamespaceSchemaLocation="urn:magento:framework:View/Layout/etc/layout_generic.xsd">
   <update handle="formkey"/>
   <container name="root">
       <block class="{Vendor}\{Modulename}\Block\Adminhtml\ProductExample\Grid" name="admin.block.{identifierName}.grid"/>
   </container>
</layout>
Creating a Form
Then, create a form that an admin can populate with data for each ‘Look’ and a block in the path Vendor/Module/Block/Adminhtml/Product/Edit/Form.php.
It should look like this:
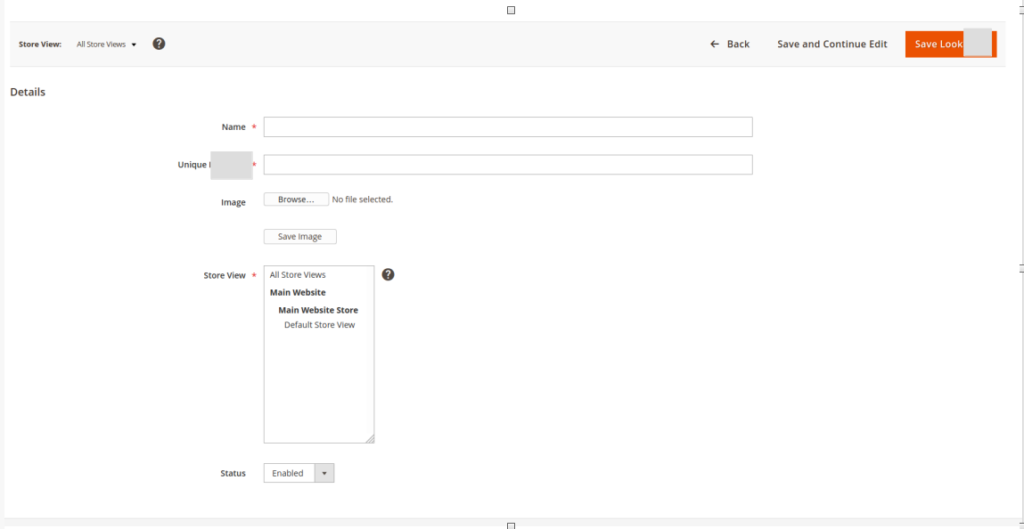
Since there are not many fields we will keep it as simple as we can.
Start as in the example below. Let this keep you on the right track while creating your own form fields.
Here is a form content example:
protected function _prepareForm()
{
//get model from registry
   $model = $this->_coreRegistry->registry('lookIdentifier');
//create form with some basic information, id, action, method, enctype
   /** @var \Magento\Framework\Data\Form $form */
   $form = $this->_formFactory->create(
       array(
           'data' => array(
               'id' => 'edit_form',
               'action' => $this->getUrl('*/*/save', ['store' => $this->getRequest()->getParam('store')]),
               'method' => 'post',
               'enctype' => 'multipart/form-data',
           ),
       )
   );
   $form->setUseContainer(true);
   $form->setHtmlIdPrefix('{somePrefix}');
//add fieldset
   $fieldset = $form->addFieldset('base_fieldset', ['legend' => __('Details')]);
//load model id
   if ($model->getId()) {
       $fieldset->addField('look_id', 'hidden', ['name' => 'look_id']);
   }
//add fields name as text type
   $fieldset->addField('title', 'text',
       [
           'label' => __('Name'),
           'title' => __('Name'),
           'name'  => 'title',
           'required' => true,
       ]
   );
//add unique identifier as text type
   $identifier = $fieldset->addField('unique', 'text',
       [
           'label' => __('Unique Identifier'),
           'title' => __('Unique Identifier'),
           'name'  => 'unique',
           'required' => true,
           'class' => 'validate-xml-identifier',
       ]
   );

   ...
   //add values to the form from model data
   $form->addValues($model->getData());
   //set form
   $this->setForm($form);
   //return prepared form
   return parent::_prepareForm();
}
Saving the ‘Look’
After that, create the Vendor/Module/Controller/Adminhtml/Index/Save.php file which will be responsible for saving the ‘Look’ in the database.
An example to start with:
class Save extends \{Vendor}\{Module}\Controller\Adminhtml\Action
{
   /**
    * Save action
    *
    * @var \Magento\Framework\View\Result\PageFactory
    */
   public function execute()
   {
       $resultRedirect = $this->_resultRedirectFactory->create();


       //get data from post request
       if ($data = $this->getRequest()->getPostValue()) {
           $model = $this->_lookFactory->create();
           $storeViewId = $this->getRequest()->getParam('store');
           //get id from request
           if ($id = $this->getRequest()->getParam('look_id')) {
               $model->load($id);
           }
After loading the model, we can check whether it exists or not. We can manipulate data in order to create or update the “Look” item.
After retrieving all data, we can save the model. Don’t forget to add it to the Try-Catch block, just in case.
try {
   //save model
   $model->save();
...
} catch (\Exception $e) {
...
}
The JS library will be responsible to send the Ajax call for collecting the data when you create the pin and save the product.
Submitting the Form
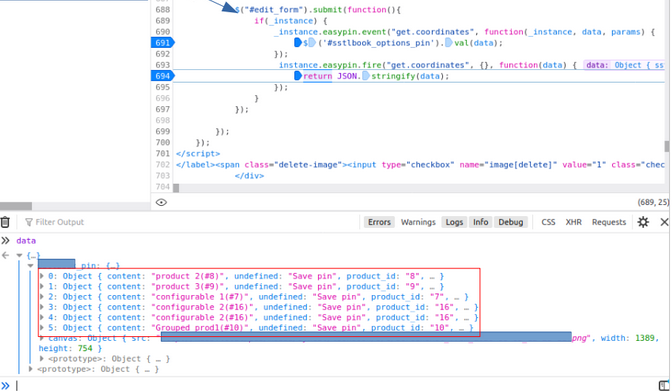
In order to submit the form, click the orange Save button. The event will fire and the data like the one in the screenshot below will be passed. With that information, the ‘Look’ will be saved in the database along with the coordinates for its products.
At the bottom, we can see the pins and the canvas which are the most important part of the JSON. We will use this data stored in the database in order to display the canvas with its pins on the frontend.
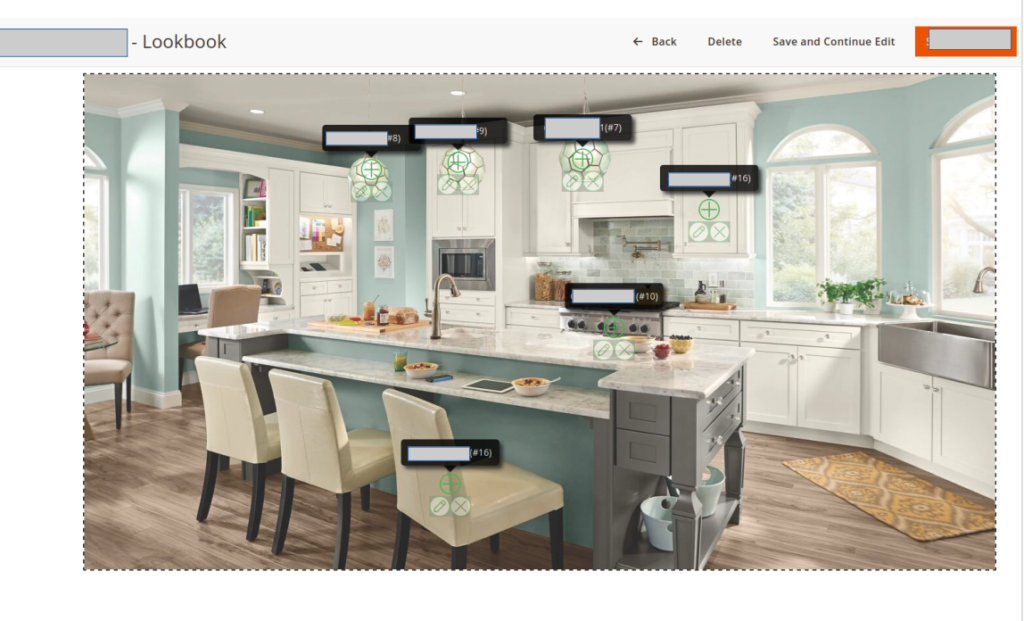
Now that the data is saved in the database, we can reopen the ‘Look’ item and see all data. In the image below, we can see how the image (canvas) and products (pins) are displayed:
Creating the Widget
The next step is to build a widget. We can add the widget with the ‘Look’ content to a CMS page.
Create Vendor/Module/etc/widget.xml and the widget, for example:
<widget id="vendor_module_product" class="Vendor\Module\Block\Widget\Product">
  <label translate="true">Widget</label>
  <description>Widget products</description>
  <parameters>
     <parameter name="identifier" xsi:type="select" source_model="Vendor\Module\Model\Widget\Config\Product" required="true" visible="true" sort_order="0" >
        <label translate="true">Identifier</label>
     </parameter>
          <parameter name="template" xsi:type="select" required="true" visible="true">
              <label translate="true">Template</label>
              <options>
                  <option name="default" value="product.phtml" selected="true">
                      <label translate="true">Default</label>
                  </option>
              </options>
          </parameter>
  </parameters>
</widget>
After we have created the widget and its necessary files, we can add it to the CMS page that will be displayed on the frontend page.

Don’t forget to create the Vendor/Module/view/frontend/templates/product.phtml file which will be responsible for getting the collection from the database, parsing the data, and rendering items. The most important functions are to get product collections, canvas URL, and pins.
Get the Pin Image URL:
public function getPinImageUrl($file)
{
  $resizedURL = $this->_storeManager->getStore()->getBaseUrl(\Magento\Framework\UrlInterface::URL_TYPE_MEDIA) . $file;
   return $resizedURL;
}
Get the product collection based on the product’s ID:
public function getProductCollection($producIds)
{
   $productCollection = $this->_productCollectionFactory->create();
   $productCollection->addAttributeToSelect('*')
           ->addAttributeToFilter('entity_id', array('in' => $producIds));
   return $productCollection;

}
You can get the pins from the decoded JSON from the database:
$options = json_decode($this->getOptions(), true);
if(!isset($options['{varName}_pin'])) return;
After that, you should look through the items and get the desired data. Before you start, please create InstallSchema.php that will be responsible for data storage. The most important part of it is the Options column which will contain pin coordinates. Let it be TYPE_TEXT.
Of course, you can add as many widgets and products (pins) as you want. In case some pins don’t have an assigned product they will not be displayed. And if all of the pins are empty (in case that pins are created without products) the canvas will not be displayed.
The final view of Shop The Look:

Conclusion
With all the acquired knowledge, you should be able to mix the right ingredients and get a fine recipe called ‘Shop the Look’ functionality. It will help you grow your business and increase sales.
In case you need any tech help or you want to purchase this or some other Syncit Group extension, you can contact us at [email protected].
